You can add AI failure detection to any 3D printer that has a camera (or that you can plug a webcam into) by connecting the printer to SimplyPrint and turning on detection in the panel. SimplyPrint runs the AI in the cloud, auto-pauses the print the moment it sees spaghetti, warping, or blobbing, and sends you a snapshot. Any printer with a camera works: an Ender 3 with a USB webcam, a Prusa MK4 with its native cam, a Bambu Lab without paying for the X1C upgrade, an OctoPrint or Klipper rig, or anything in between. No hardware swap. No buying a new printer.
This guide walks through how to add AI failure detection to any 3D printer, what counts as a workable camera setup, what the AI actually catches (spaghetti, warping, blobbing, with more on the way), what it does not catch yet, and how to tune false positives. By the end you will know exactly what it takes to retrofit failure detection onto the printer you already own.
How to add AI failure detection to any 3D printer, end-to-end
Three things, in order: a free SimplyPrint account, a camera pointed at the print bed, and the printer connected to SimplyPrint through whatever connection path your printer supports. Turn on AI failure detection in the panel. That is the entire setup. The cloud model starts analysing frames the moment the next print begins.
If you have already searched "AI failure detection Ender 3" or "spaghetti detection Bambu Lab P1S" and ended up at a half-finished Raspberry Pi project, a paid plugin, or a fork of a research model from 2022, that is the gap this guide closes. The whole point of doing the AI in the cloud is that the printer no longer has to be the bottleneck. A 10-year-old Ender 3 with a $20 webcam gets the same detection model as a brand-new flagship.
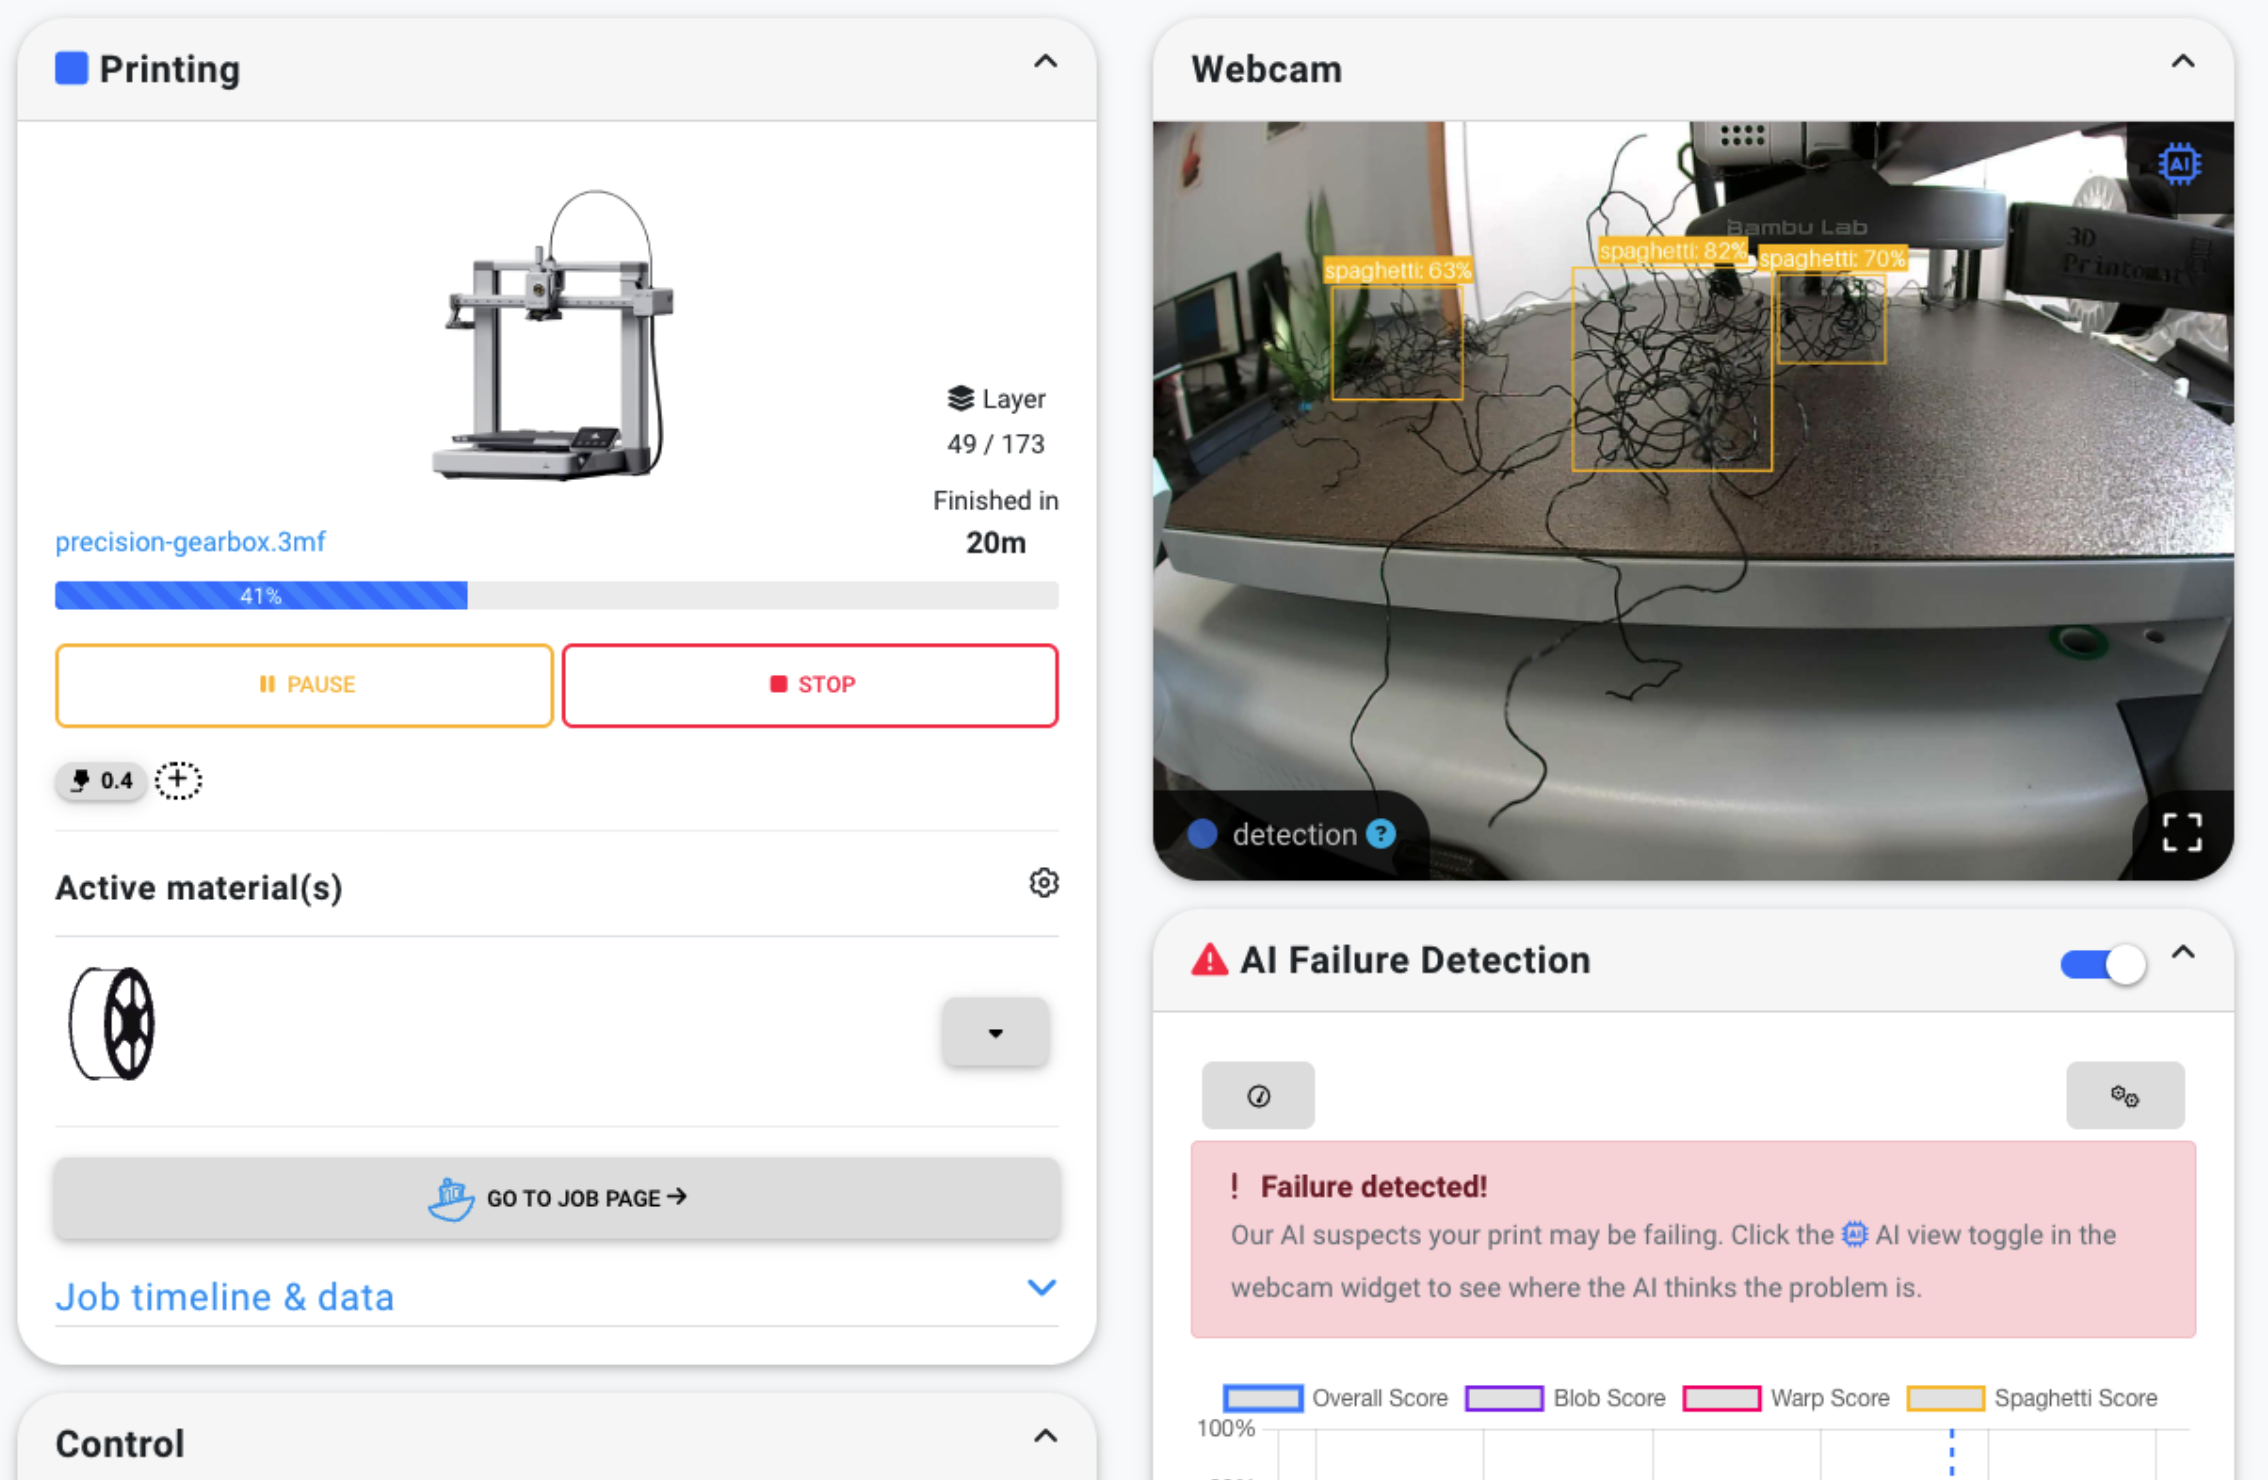
AI Failure Detection
Automatic AI-powered print failure detection
What "no failure detection" actually costs you
The reason this matters is straightforward: a print that fails 15 minutes in keeps printing for the rest of its 8 hours. The hotend keeps extruding into a tangle, the bed keeps cycling, and you wake up to a fist-sized blob of plastic, a scarred build plate, and (if you are unlucky) a clogged nozzle that took the printer out of rotation entirely.
The math: a typical overnight print is 6 to 12 hours and uses 100 to 300 grams of filament. PLA is roughly $25 per kilo, so the consumable cost of a single overnight failure is in the range of $2.50 to $7.50. Add the opportunity cost of the bed time (one full overnight slot per printer per night is what most hobbyists get) and the inconvenience of cleanup, and a failure rate of even one print per week is real money over a year. On a farm with 20 printers, a 5% failure rate that nobody catches in time is dozens of kilos of wasted filament per month.
The point of AI failure detection is to short-circuit that loop the moment a frame shows the print has gone wrong. Pause the printer. Cool down. Notify the operator. Let the operator decide whether to cancel, attempt a recovery, or keep going. Nothing more is extruded into the failure while you decide.
What you need to add it to your printer
Three concrete prerequisites, in order:
- A SimplyPrint account. Free tier works for the beta. Sign up at simplyprint.io.
- A camera pointed at the print bed. Any of the following work:
- The printer's own built-in camera (Bambu Lab X1C/P1S/A1, recent Creality models, Prusa with the Prusa Camera, etc.).
- A USB webcam plugged into a Raspberry Pi, OctoPrint host, Klipper host, or a Windows/Linux/Mac computer connected to SimplyPrint.
- A Raspberry Pi camera module attached to a Pi running OctoPrint, Mainsail, or Fluidd.
- Any camera SimplyPrint's control panel can already display.
- The printer connected to SimplyPrint via its supported path. Bambu Lab printers connect through the SimplyPrint Bambu Lab Client, a small app you run on a Raspberry Pi or always-on computer on the same network as the printer; setup uses the printer's IP, access code, and serial number from the printer's own screen (full guide). Klipper / Mainsail / Fluidd / Moonraker connect through SimplyPrint's host integration. OctoPrint connects through the SimplyPrint plugin. Prusa, Creality, Anycubic, Voron, and most other Cartesian and CoreXY printers connect either through SimplyPrint Hub (a small host service) or directly through their network protocol.
If the printer is already connected to SimplyPrint with a working camera feed, enabling failure detection is a single toggle in the printer's settings panel. There is no firmware change, no slicer change, no extra hardware.
What SimplyPrint catches that vendor-built detection often doesn't
This is the angle most "add AI to your printer" guides skip. Some printers do ship with first-party AI failure detection. Bambu Lab's X1C and P1S, for example, have on-device detection. It is genuinely good at what it does, and it is fast because it runs on the printer's own silicon. But the published scope is narrow: per Bambu Lab's own wiki, the on-device model is documented as catching spaghetti, not the broader class of failure modes.
SimplyPrint's AI failure detection covers three categories today, with more in active development. Spotting the failure is only half the problem, though, so each row also points at the matching SimplyPrint troubleshooting guide for fixing the underlying cause once you've caught it.
| Failure type | What it looks like | Vendor built-in (typical) | SimplyPrint | How to fix it |
|---|---|---|---|---|
| Spaghetti | The extruder keeps moving but the part has detached or collapsed; filament piles up | Often covered | Yes | Spaghetti troubleshooting |
| Warping | Corners or edges lift off the bed, distorting layer geometry over time | Rarely covered | Yes | Warping troubleshooting |
| Blobbing | Extrusion accumulates in one area, forming a growing lump that fouls the nozzle or moves with the toolhead | Rarely covered | Yes | Blobs and holes troubleshooting |
| Layer shift | The X or Y axis slips and the part offsets mid-print | Sometimes (gyroscope-based) | Coming soon | Layer shift troubleshooting |
| Stringing / zits | Surface defects from retraction or hot-end ooze | Not detected | Coming soon | Stringing / scars on top |
This is why the framing of the SimplyPrint feature is "more than just spaghetti detection". Even if you own a printer with built-in detection, you gain coverage for warping and blobbing that the printer cannot catch on its own. On a Bambu Lab printer, you can keep the on-device detection running and add SimplyPrint's cloud detection on top: two complementary layers, not a replacement.
The full print troubleshooting library covers another fifteen common 3D printing problems beyond the ones the AI detects automatically (clogged nozzle, elephant's foot, dimensional inaccuracies, weak infill, and more). Useful when a failed print's root cause is in the slicer settings or the hardware, not in the print's appearance.
For warping specifically, SimplyPrint catches the failure mode that on-device spaghetti detectors miss most often, which is the corner lift that does not detach the part but distorts every subsequent layer. The print keeps "succeeding" in the sense that the toolhead never loses the part, but the geometry is wrong. A vision model that has seen thousands of warping examples picks this up far earlier than a model trained on detached-and-tangled scenarios.
How AI failure detection actually works
Once enabled, the workflow is:
- Frame capture. SimplyPrint pulls a frame from your camera every few seconds.
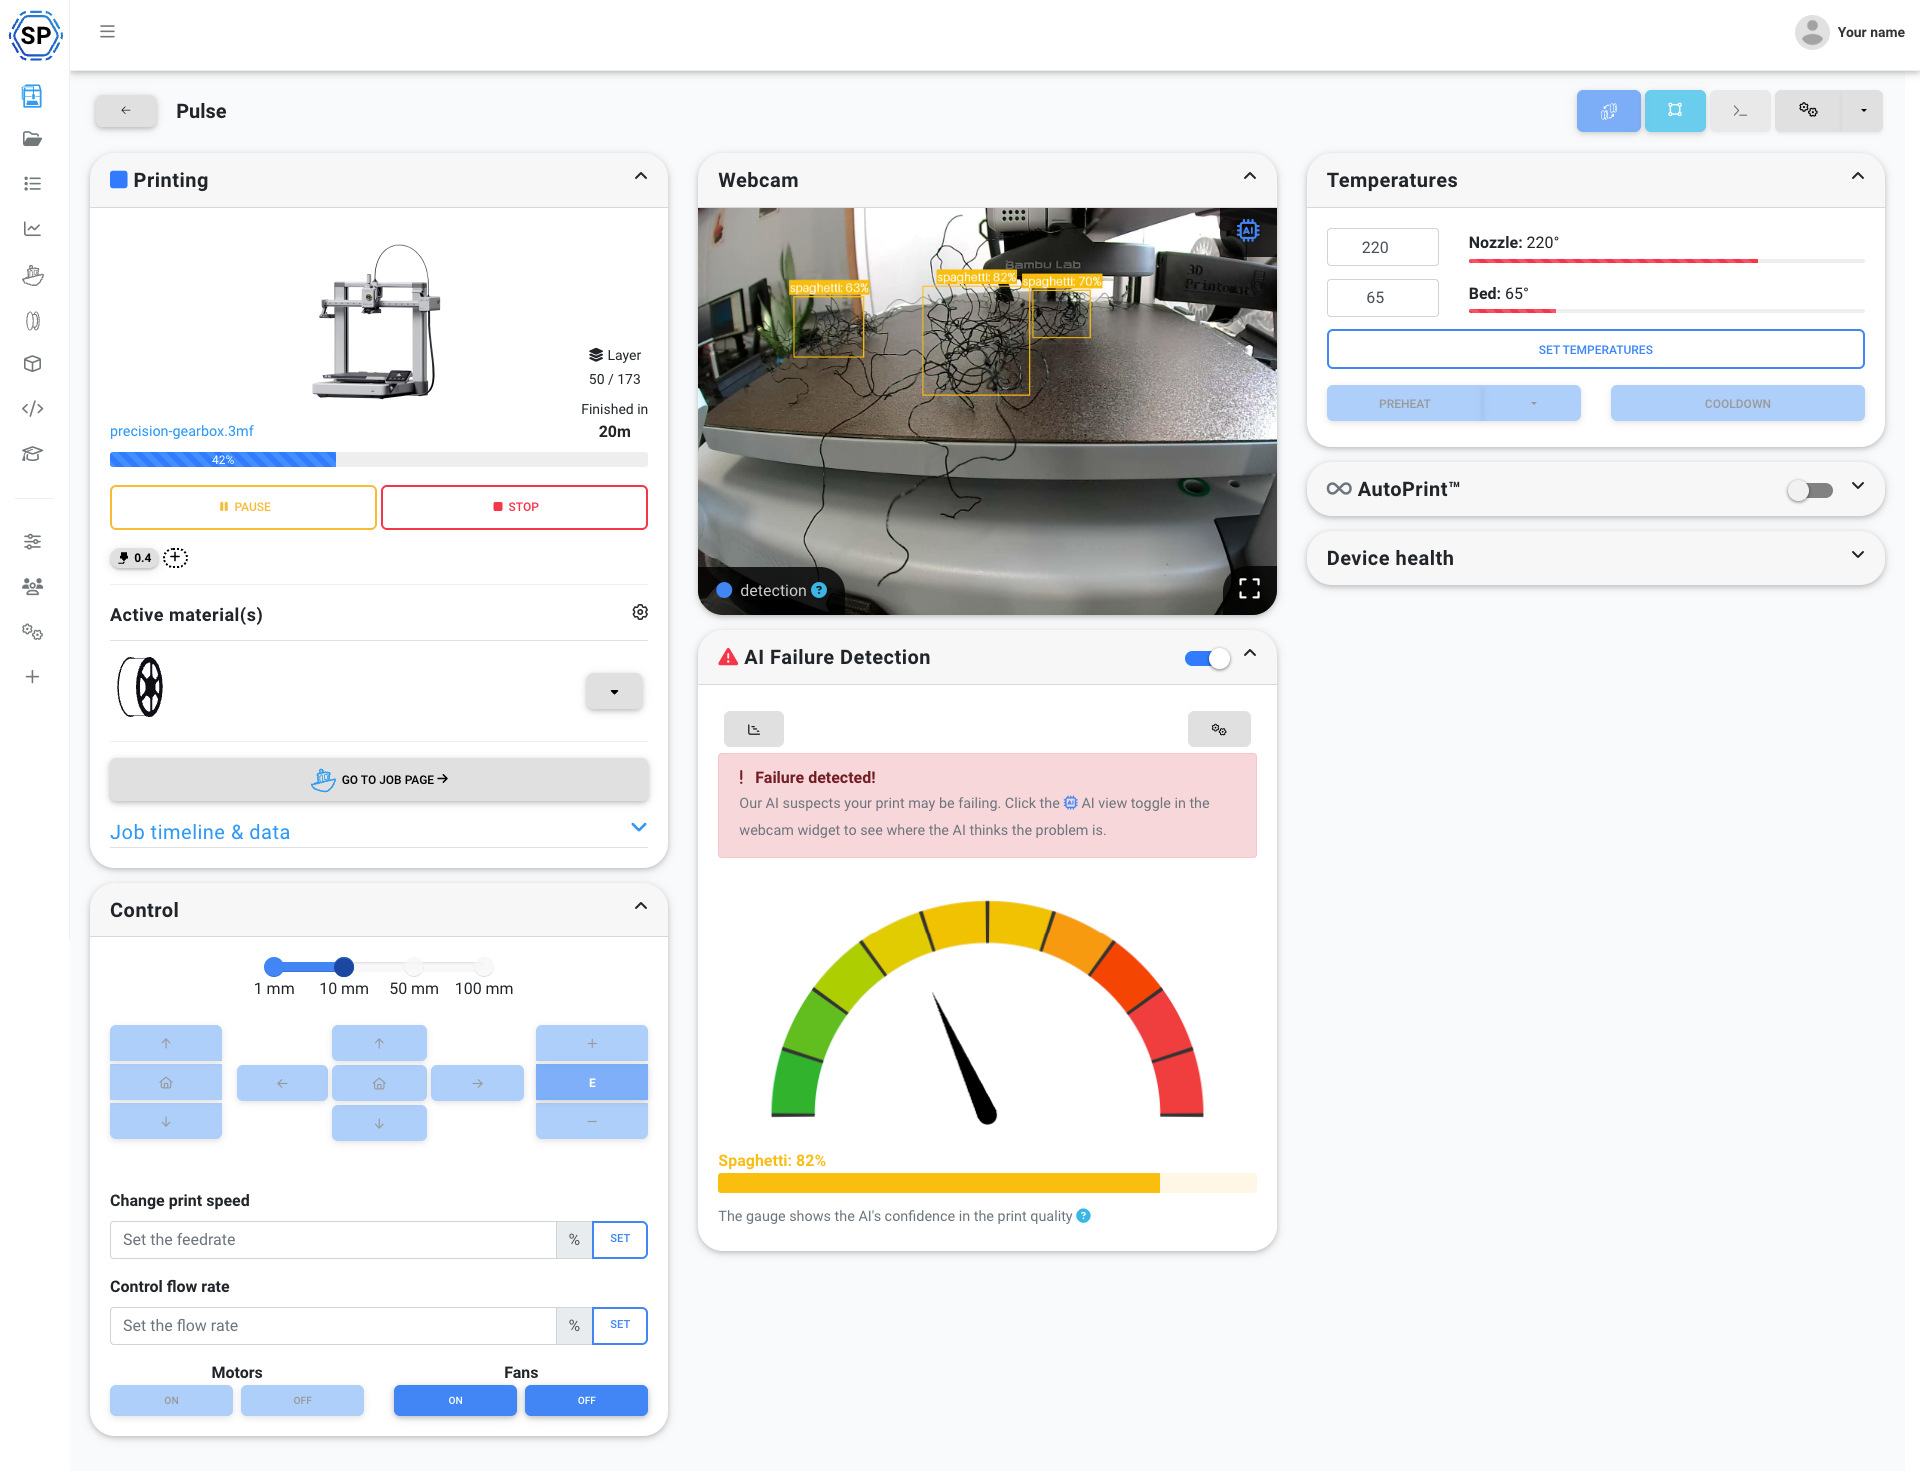
- Cloud inference. The frame goes to the AI model in our cloud. The model returns a confidence score for each detection type (spaghetti, warping, blobbing) along with a heatmap of where in the frame it sees the problem.
- Threshold check. If a detection type stays above its configured threshold for long enough, the system decides the failure is real and not a single noisy frame.
- Action. Based on your settings, the system pauses or cancels the print, or just notifies you. Pause is the default for a reason: the print is held while you decide, and no filament is extruded into the failure during that window.
- Notification. You get an alert with a snapshot of the flagged frame, an overlay showing what the AI saw, and one-click options to resume, cancel, or dismiss.
- Operator decision. You look at the snapshot from wherever you are (phone, laptop, panel), confirm or dismiss, and the print either resumes or cancels. If you confirm a failure, the printer goes out of AutoPrint rotation until you reset it (see the maintenance checklist for the on-demand maintenance flow that pairs with this).
The full promo video from the AI failure detection feature page walks through the live behaviour end-to-end:
The crucial property here is that pause comes before notification. The print is already paused while the notification is in flight. Even if you take an hour to look at your phone, no extra filament is extruded into the failure during that hour. Compare with a notification-only system (or worse, an email about a failure that happened three hours ago), where the loop runs to completion before you ever see it.
Camera setup that actually works
This is the section most "AI for 3D printing" content skips, and it matters more than the choice of camera. A great model on a badly framed camera is worse than a mediocre model on a well-framed one.
Framing. Point the camera at the print head zone, not the whole bed from across the room. The model needs to see the layer-in-progress with enough pixels to distinguish a clean extrusion from a tangle. A camera roughly 20 to 50 cm from the bed, angled down at the build area, is the sweet spot. A ceiling-mounted camera capturing the whole enclosure looks impressive but gives the model less to work with.
Lighting. Even, indirect light is best. The printer's chamber LEDs are usually fine if the camera is inside the enclosure. Outside-the-enclosure cameras need a small LED strip or a desk lamp aimed at the bed. Two pitfalls to avoid:
- Backlighting. A bright window behind the printer blows out the bed and turns the print into a silhouette. The model cannot see what colour the filament is, let alone whether it has detached.
- Pure darkness. A camera with no fill light produces grainy frames that the model treats as noise. Some printers have internal LEDs that turn off during a print to save power; check this and override if needed.
Camera quality. A $20 webcam at 720p is plenty for the AI. The bottleneck is framing and lighting, not megapixels. If you have a $200 webcam already, great, but do not buy one because of the AI. The model has been trained on footage from every camera class from cheap USB webcams up to high-end machine-vision cameras and treats them similarly once they are in focus.
False positives, and how to tune them
No vision model is perfect. SimplyPrint's is honest about that. False positives exist, and the system is built to be tuned per printer.
The two main controls:
- Sensitivity. Per detection type, per printer. Lower sensitivity = the system needs higher confidence and longer duration before acting. Higher sensitivity = faster catches but more false alarms. The default sits in the middle and is fine for most prints; tune up if a category of failure keeps slipping through, tune down if a specific printer has a geometry that the model misreads.
- Detection zones. You can draw a region of the frame the model should focus on, and exclude everything else. If your camera has the AMS, the spool holder, or the chamber lights in view, mask those out. The model gets fewer false signals from non-print regions and runs more accurately on what is left.
Geometries that tend to trigger false positives:
- Vase mode prints. Single-wall, sweeping geometry can look like spaghetti to a model trained on solid prints. Lower sensitivity for vase prints, or pause detection for that specific job.
- Lattice or gyroid infill exposed to the camera. Exposed infill at the top of a print without a top layer (a fairing, a heatsink) reads as chaos. Mask the centre of the frame for these.
- Translucent or very dark filaments. The model has less contrast to work with. Tune sensitivity per filament type; some farms keep one printer's sensitivity offset specifically for clear PETG.
- Multi-colour transitions. The brief moment of a colour change with a purge tower in frame can register as "blobbing". This is decreasingly common as the model learns purge towers as a known pattern.
When the system flags a false positive, you can dismiss it in one click. That dismissal feeds back into the per-printer tuning so the same geometry is less likely to fire next time. Over a few weeks on the same printer, false positives drop noticeably.
What AI failure detection does not catch (yet)
Honest list. Some failure modes are hard for any vision system, vendor-side or cloud-side:
- Warping that doesn't lift off the bed. A part bowing slightly inward without detaching can finish "successfully" with wrong geometry. Caliper-checked tolerance is still on the operator.
- Dimensional accuracy. The model sees the print, not the slicer's intended geometry. A part that prints at 99.2% of its intended size looks fine on camera.
- Colour issues. Wrong-colour filament, partial colour bleed in multi-material setups, AMS lane misidentification. The model is shape-aware, not strictly colour-aware in the way you would need for these.
- Infill density problems. Under-extrusion that only shows up inside the part (between top layers and the model surface) is invisible from any camera angle.
- Hardware-specific failures. AMS jams on Bambu Lab, MMU calibration drift on Prusa, belt skipping on Voron: these have vendor-side detection (gyroscopes, lane sensors, encoder feedback) that is better than vision. Use both where they exist.
- First-layer adhesion failures that the toolhead doesn't move past yet. If the very first extrusion lifts and the printer keeps trying for several layers, the AI catches it. If it has only been 30 seconds, the AI is still calibrating against the early frames.
Defer hardware-specific detection to whichever vendor system catches it best, and use SimplyPrint's failure detection for the print-shape failure modes that cameras are uniquely suited to.
Where to go from here
The point of this article is that you do not need a new printer to get AI failure detection. The printer you already own (Ender, Prusa, Creality, Anycubic, Voron, Bambu Lab, anything connectable) gains spaghetti, warping, and blobbing detection through SimplyPrint, with no firmware change, no slicer change, and no on-device compute load. If your printer already has built-in detection (typically spaghetti-only), SimplyPrint adds the failure types it does not cover.
If you run more than one printer, the natural next step is wiring failure detection into the broader unattended-printing stack: AutoPrint pauses are a clean signal for taking a printer out of rotation (see how to continuously print with a 3D print farm), and confirmed failures become on-demand maintenance jobs in the print farm maintenance checklist. The whole point of catching a failure in minute 15 instead of hour 8 is to give the rest of the farm a chance to keep running while you fix the one printer that needs attention.
For the full live-product walkthrough (settings, sensitivity controls, detection zones, the multi-printer view, and the latest detection types in development), the /features/ai-detection page has the timelapses, the demo, and the settings tour. The /features/notifications page covers the alerting side: which channels (email, push, in-panel, webhook) the failure snapshot can be delivered through, and how to tune which detections actually notify you in the middle of the night.