Staggered start is the feature that keeps a 3D print farm of 30 Bambu Lab X1 Carbons from tripping its own breaker every shift change. A single X1C pulls roughly 1 kW peak while the bed and hotend heat to temperature (Bambu's own wiki lists the X1C series at 1000 W maximum). Multiply that by 30 simultaneous starts and you are pulling 30 kW for the heatup window. A standard 16 A circuit at 230 V tops out around 3.7 kW. The breaker trips, the farm goes dark, and every in-flight print on adjacent circuits brown-outs.
The fix is not a bigger circuit. It is to spread the heatup spike across a configurable window so the steady-state load is what your wiring has to handle, not the spike. This guide walks through what 3D print farm staggered start actually does in the SimplyPrint platform, the 3D printer power consumption heatup economics underneath it, what it does not do, and the line where staggered start stops helping and an electrician starts.
The problem: kicking a farm into heatup all at once
A 3D printer's power draw is not constant. It looks like this:
- Idle: roughly 20 to 30 W. The control board, fans on low, and a screen are on.
- Heatup: 600 to 1000 W or more, sustained for 2 to 5 minutes. The heated bed and hotend pull as much current as the firmware allows, because heating is just resistance dumped into a metal plate and a brass block.
- Printing: 80 to 150 W steady-state. The bed is at temperature so it cycles on and off duty; the hotend is similar; steppers and fans add a small constant load.
- Cooldown: drops back to idle within minutes once the print finishes.
The 10x ratio between idle and heatup is what makes farms fragile at startup. A farm of 20 Bambu Lab P1S printers (rated around 1000 W peak on the wiki) draws something like 400 W idle, 2 kW or so while printing, and up to 20 kW for the few minutes the whole fleet is heating at once. Your wiring sees the 20 kW peak even if your steady-state need is 2 kW.
Two failure modes follow from this:
- Breaker trip. If the heatup spike exceeds the circuit's instantaneous rating, the breaker opens and cuts power to everything on the circuit. Every in-flight print on that circuit dies. You lose hours of work and a roll of filament per printer.
- Brownout. If the spike sags the voltage on the circuit (or the building) below the printer's tolerance, control boards reset, prints abort mid-layer, and on some printers the slicer profile cache gets corrupted. Some prints die silently and only show up as failed in the morning.
Both are operational, not capital, problems. The fix is to never make the heatup spike happen all at once.
What staggered start actually does
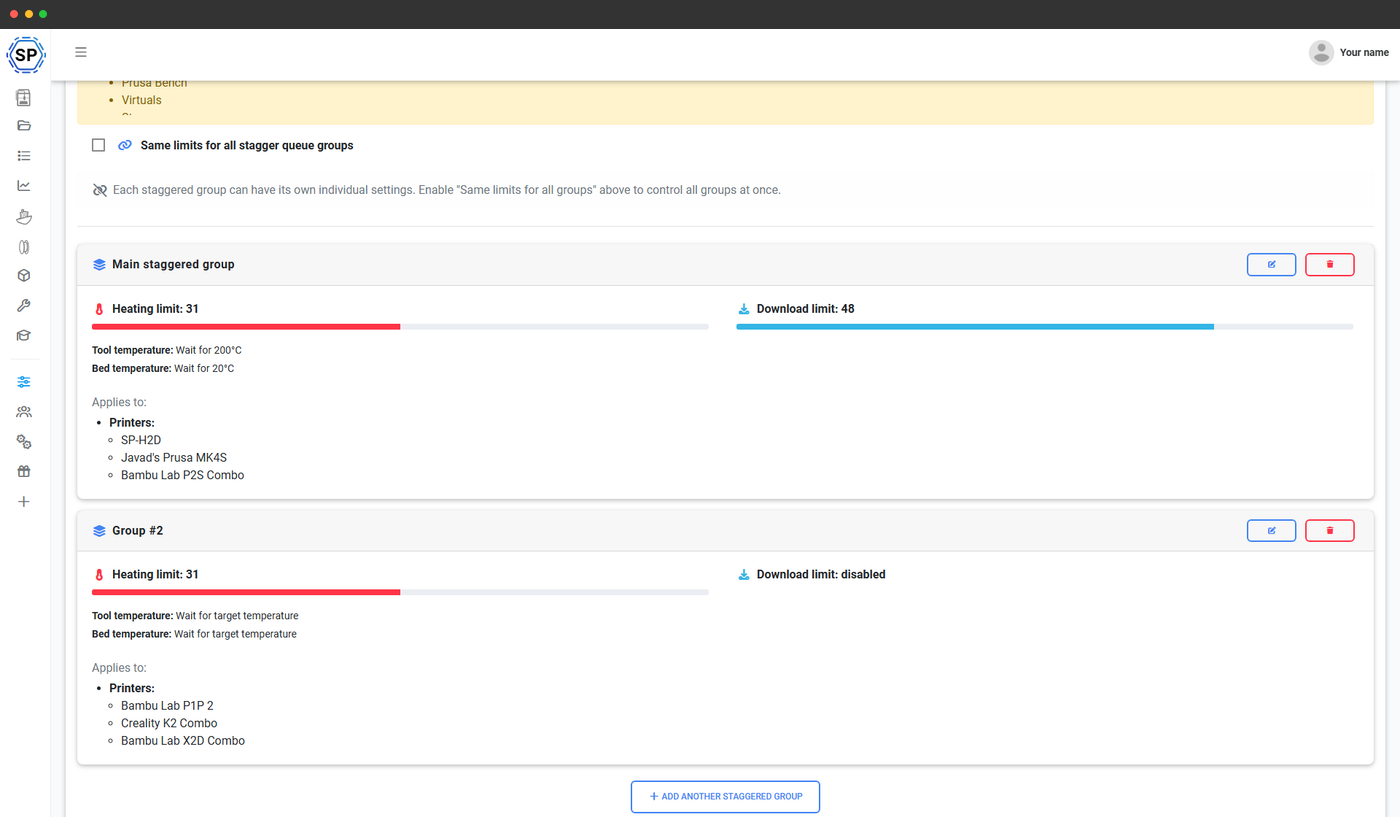
Staggered start is a queue layer that sits between "user hits start" and "printer begins heating". You define one or more stagger groups, each tied to a set of printers (manually, or by printer group), and each with two limits:
- Heatup limit. How many printers in this group can be in the heatup phase simultaneously.
- Download limit. How many printers can be pulling files from SimplyPrint at the same time (useful when the bottleneck is your uplink, not your wiring).
When a print job is started, SimplyPrint puts it in the stagger group's pending list. The job stays pending until two checks pass:
- The file finished downloading to the printer (or downloading is in progress within the download cap).
- The number of printers currently heating in the group is below the heatup limit.
Once both pass, the printer is told to heat. The moment heatup completes and the printer starts laying down filament, that slot frees and the next pending job in line moves into heatup. The cycle continues until every print is running.
In practice, a farm of 30 printers with a heatup limit of 3 sees something like this:
| Time | Heating | Pending |
|---|---|---|
| 0:00 | 3 (printers 1-3) | 27 |
| 0:03 | 3 (printers 4-6) | 24 |
| 0:06 | 3 (printers 7-9) | 21 |
| ... | ... | ... |
| 0:27 | 3 (printers 28-30) | 0 |
Roughly half an hour from "start everything" to "every printer running", with no breaker ever seeing more than three printers in heatup at once. Every printer prints at full speed in parallel from that point on.
Staggered Start
Run a print farm on the power you've actually got
The heatup limit is set per stagger group from the panel. Leave it blank for a group when you have plenty of headroom and don't need a cap. The full settings page lives at /panel/settings/staggered-start.
What staggered start does NOT do
Three things, worth saying clearly because the feature gets overhyped in conversation:
- It does not increase your circuit's amperage. If your printers' steady-state combined load already exceeds the breaker rating, staggered start cannot help. The breaker will trip the instant the last printer in line finishes heatup and joins the rest at print-time draw.
- It does not toggle mains power to the printers. Printers stay powered on at idle. The "stagger" is the heatup command, not the mains power.
- It does not replace a real electrical assessment. A farm of more than a handful of printers on shared circuits should be measured with a clamp meter at minimum, and ideally surveyed by a licensed electrician before scaling further. Staggered start buys headroom; it does not invent capacity.
The power economics: heatup spike vs steady-state draw
A useful mental model. The math is rough but the ratios are real.
| Phase | Per printer | 20-printer farm |
|---|---|---|
| Idle | 25 W | 0.5 kW |
| Heatup (peak) | 800-1000 W | 16-20 kW |
| Printing (steady) | 100-150 W | 2-3 kW |
| Cooldown | 50 W | 1 kW |
A 16 A circuit at 230 V is rated at 3.68 kW continuous (and the 80% continuous load rule means you should plan on roughly 2.95 kW sustained). The 20-printer farm's steady-state draw of 2-3 kW fits inside one circuit. Its heatup spike of 16-20 kW does not, by a factor of five.
A 15 A circuit at 120 V (North American residential) is even tighter: 1.8 kW rated, around 1.4 kW continuous. Six printers heating at once is already over budget.
Staggered start lets the steady-state line, not the spike line, define what your wiring needs to support. That is what unlocks running more printers per circuit than naive math would suggest. The honest answer to "how many 3D printers on one circuit can I run?" is "as many as your steady-state load fits, provided you stagger the heatup". A garage with one 20 A circuit at 240 V can run 30 small printers at steady-state with a heatup limit of 3 to 4, even though starting all 30 cold would draw 25 kW for a minute.
Why printer-side "power recovery" is not the answer
Several printer brands ship a "power recovery" or "power loss recovery" feature: Bambu Lab calls it Power Loss Recovery; Creality calls it Resume After Power Loss; Prusa calls it Crash and Power Failure recovery. When the printer loses power mid-print, it remembers the layer and Z position, and on power-up offers to resume.
These features solve a different problem from breaker trips. Power recovery handles the case where the breaker (or grid) cuts mid-print. It does not prevent the cut from happening, and it does not help with the simultaneous heatup spike in the first place. In particular:
- Power recovery requires the printer to actually power up successfully. If your breaker trips because the recovery attempt tries to heat 30 printers at once, you are right back where you started.
- Recovery is per-printer. A 30-printer farm losing power means 30 manual confirmations to resume, often with slightly different states.
- The resumed layer is approximate. Some prints (small parts, particularly those that lost the first few layers' adhesion during the outage) come back failed.
The right tool to prevent breaker trips 3D printer farms should reach for is staggered start at the orchestration layer, not power recovery at the printer. Power recovery is a fallback for when something else (a real outage, an unrelated load, a transient sag) takes the power down anyway. The two solve different problems and should both be enabled. They do not substitute for each other.
UPS strategy: protect the network, not the heaters
A common instinct after the first breaker trip is to shop for a UPS for 3D printer farm protection and put each printer on it. This is almost always wrong. The math:
- A printer pulls 800-1000 W during heatup. A consumer UPS rated 1500 VA / 900 W can barely sustain one printer's heatup for two minutes. A 30-printer farm needs 30 UPSes, each cost-effective only at low loads.
- Online double-conversion UPSes that handle that load reliably are commercial-grade, expensive, and noisy.
- The reason you want power continuity (avoiding lost prints) only applies to the printers that are actively printing. A printer in heatup or idle does not benefit from UPS protection in any practical way.
A better strategy: put the network and control side on a UPS, not the printers. That covers your network switch, the router, the Wi-Fi access point, the local management hub (a NAS, a Raspberry Pi, or a small server). When mains power blips for 30 seconds, the printers continue running on grid power (or trip the breaker if mains is gone entirely), but the network stays up so SimplyPrint can detect the state, log it, and resume orchestration cleanly when power returns. The printers themselves use their built-in power recovery if mains drops; you do not need to redundantly UPS the heaters they cannot keep going on a battery anyway.
How to size your staggered window: the calculator
The staggered-start settings page in the SimplyPrint panel includes a built-in heatup limit calculator. It takes three inputs:
- Voltage. US/North America (120 V) or EU/rest of world (230 V), with a custom override for split-phase 240 V or non-standard installations.
- Circuit breaker rating in amps. Common values: 10, 15, 16, 20 A.
- Printer power class. Small (~200 W; Prusa MINI class), medium (~500 W; Bambu Lab P1S, Prusa MK4 class), or large (~700 W; large-format CoreXY).
The calculator applies the standard 80% electrical safety derate and divides the safe circuit wattage by the per-printer wattage. A 16 A circuit at 230 V with medium printers, for example, yields a recommended limit of (16 × 0.8 × 230) / 500 = 5.9, rounded down to 5.
That number is a starting point, not a guarantee. Real circuits have other loads on them (lighting, computers, an AC unit), real printers vary slightly in their heatup current, and material choice matters too: ABS and PC need higher bed temperatures and pull more current for longer than PLA. The reliable approach is to start with the calculator's recommendation, try heating that many printers at once, and drop by one if the breaker trips or you see voltage sag. Once you stop tripping, you have your real limit.
The two practical tuning tips:
- Round down, not up. A staggered limit that is one too high trips a breaker. A limit that is one too low costs you a few extra minutes at startup. The asymmetry is obvious.
- Tune per group, not globally. A garage on its own 20 A circuit, an office on a shared 15 A circuit with a computer, and a basement on a dedicated 32 A subpanel are three different problems with three different right answers.
How staggered start interacts with AutoPrint and the queue
Staggered start sits in the dispatch path between the print queue, AutoPrint, and the printer itself. The order of operations:
- The queue (or AutoPrint, or 1-Click Print, or the public API) picks a printer-job pair and requests "start this job on this printer".
- SimplyPrint enters the job into the stagger group as pending on both fronts: pending download and pending heatup.
- The file download starts as soon as the download cap allows. When the file is on the printer, the download is done.
- SimplyPrint then checks whether the group has capacity for another heatup. If the number of printers currently heating in the group is below the heatup limit, the printer is sent the start command and joins the heating set.
- When the printer's hotend and bed reach print temperature, the heat slot is no longer counted as "currently heating" and frees up for the next pending job.
This means staggered start is transparent to whatever is driving prints. AutoPrint dispatching a continuous farm, a bulk 1-Click Print from the panel, or a single API call all flow through the same stagger gate. You do not have to think about it after configuration.
A subtle but important point: when a stagger group has more printers wanting to heat than the window can space, the queue holds. It does not skip or drop. A printer waiting for its heat slot stays pending until released. This is also how staggered start interacts with printer maintenance mode: a printer in maintenance is excluded from AutoPrint dispatch, so its slot in the stagger group is never consumed.
For the broader picture of how AutoPrint orchestrates a continuous farm (including the four bed-clearing methods, queue tag matching, and failure handling), the sibling guide how to continuously print with a 3D print farm is the prerequisite read. Staggered start is the power-side layer; AutoPrint is the orchestration above it.
When you also need real electrical work
Staggered start has a clear ceiling. Once you cross it, the problem is the wiring, not the orchestration. Three signs you have crossed the line:
- Your steady-state load alone exceeds 80% of the breaker rating. Add up every printer at print-time wattage (100-150 W each is a reasonable estimate for most FDM machines, more for larger printers or higher temperatures), plus anything else on the circuit. If that number is above the 80% derate (12.8 A on a 16 A breaker, or 12 A on a 15 A breaker), staggering will not save you. The breaker will trip eventually, often hours into a run when everything is finally up to printing temperature.
- You see voltage sag at the wall even with staggered start. Plug a cheap voltmeter or a Kill-A-Watt-style meter into an outlet on the same circuit. If voltage drops more than 5 V (or roughly 4%) under print load, the circuit or the upstream wiring is undersized for what you are running.
- You smell warm insulation, hear a transformer hum, or find a wall plate that is hot to the touch. Stop using the circuit and call an electrician. These are signs of overload or loose connections, both of which are fire risks.
The right interventions, in increasing cost order:
- Move printers to different circuits in the same room. Most outlets in a domestic install are wired in pairs on alternating circuits. Plugging four printers into two pairs of outlets often distributes load you thought was on one circuit.
- Pull a dedicated circuit. A 20 A or 30 A circuit dedicated to a farm room, with no other loads, dramatically simplifies the math and the staggering settings.
- Pull a sub-panel. For farms above 10-15 printers on what was originally a residential install, a dedicated sub-panel with several dedicated 20 A circuits gives you headroom to grow and isolates the farm from the rest of the building.
- Three-phase or industrial supply. Past 50 printers, a single-phase residential service is the wrong tool. Commercial space with three-phase power and a properly sized supply is the next step.
None of these are a SimplyPrint feature. They are a contractor's job. We mention them because the most common misuse of staggered start is treating it as a substitute for adequate wiring. It is not. It is the orchestration that uses whatever wiring you have correctly.
For the rest of the farm-operations stack (maintenance schedules, spare-parts inventory, failure-rate triggers, and how those interact with AutoPrint dispatch) the /features/printer-maintenance page is the reference, and the 3D print farm maintenance checklist article is the operational companion piece. The /print-farms landing page covers the broader picture. If you want immediate operator alerts when a stagger group is sitting on a long pending queue (a sign of a stuck job or a misconfigured cap), set those up through /features/notifications.
Where to go from here
Staggered start is the small feature that unblocks a big problem. It does not change your wiring, and it does not change your printers. It changes the moment at which each printer is allowed to heat, so the moment when many printers want to heat at the same time stops being the moment your farm goes dark.
If you are starting a farm, set up one stagger group per circuit, use the calculator to pick a starting limit, and tune down by one if you see a trip. If you already run a farm and have been treating the morning breaker trip as a fact of life, staggered start is the change that makes that go away. And if your steady-state load alone is over your circuit's continuous rating, no amount of staggered start helps; that is the electrician's call, and it should happen before the next printer arrives.
The companion read for the orchestration layer above staggered start is the AutoPrint guide: how to continuously print with a 3D print farm. Together those two cover what it takes to run a farm without standing next to it.