To 3D print from SketchUp you first need a model that is a closed, watertight solid, then a slicer to turn it into printer instructions. The fast way to do both is the SimplyPrint SketchUp extension: it adds a Send to SimplyPrint button to SketchUp that exports STL or 3MF straight to your browser, where you slice with real OrcaSlicer, PrusaSlicer, BambuStudio, ElegooSlicer, CrealityPrint, and Cura engines and send the job to any connected printer. There is no manual STL export and no desktop slicer to install. That is the short version of how to 3D print from SketchUp in 2026.
There is one catch that trips up almost everyone, and most SketchUp 3D printing guides bury it: SketchUp models are very often not manifold. SketchUp happily lets you draw open surfaces, reversed faces, and overlapping geometry that look perfect on screen but do not enclose a solid volume, so they fail to slice. This guide covers that honestly first, then shows the one-click path that skips the export dance entirely.
Why won't my SketchUp model 3D print?
Because it almost certainly is not a solid. A slicer needs a closed, watertight volume so it can decide what is inside the part (to fill with infill) and what is outside (air). SketchUp was built for architecture and design, not for manufacturing, so it lets you build geometry that is visually complete but topologically open: a face missing here, two faces overlapping there, an edge that stops a hair short of meeting its neighbour. To your eyes it is a finished model. To a slicer it is a stack of disconnected surfaces with no inside.
The single most useful habit in SketchUp 3D printing is to check the Entity Info panel. Select your geometry, make it a group or component, click it once, and read what SketchUp calls it. If it says Solid Group or Solid Component, you have a watertight volume and it will slice. If it just says Group or Component, the model is non-manifold and will not print reliably until you fix it. This one check, done before you export anything, prevents most failed SketchUp prints.
How do I make a SketchUp model solid?
A "solid" in SketchUp means every edge borders exactly two faces, with no strays, no holes, and no internal geometry. To get there:
- Group the geometry. Triple-click to select connected geometry, right-click, and choose Make Group (or Make Component). Only groups and components can be solids; loose geometry never reports as solid.
- Read Entity Info. Click the group once and open
Window > Entity Info. The label at the top tells you instantly whether it is a Solid Group. - Fix the usual culprits if it is not solid:
- Reversed faces. SketchUp faces have a white front and a blue-grey back. The white side must face outward. Right-click a back-facing face and choose Reverse Faces, or select all and use
Reverse Facesto normalize them. - Internal faces. Booleans and intersections leave faces buried inside the solid. They have to be deleted, or the slicer prints them as extra walls.
- Tiny gaps and stray edges. Edges that do not quite meet, or that stick out past a corner, break the volume. Zoom in and close them.
- Coplanar overlaps. Two faces sharing the same plane confuse the solid test. Merge or delete the duplicate.
- Reversed faces. SketchUp faces have a white front and a blue-grey back. The white side must face outward. Right-click a back-facing face and choose Reverse Faces, or select all and use
A free extension such as Solid Inspector (from the Extension Warehouse) highlights the exact problem geometry and fixes many issues automatically, which is far faster than hunting by eye on a complex model. Keep iterating until Entity Info reports a solid. Only then is the model ready to slice.
What format do I export from SketchUp: STL or 3MF?
Once the model is solid, it has to leave SketchUp in a format the slicer understands. The SketchUp to STL conversion is the step most guides mean when they say "export for printing".
- STL is the universal 3D printing format. It is a plain triangle mesh with no colour, material, or per-object data. For a single-material print where only the geometry matters, STL is all you need, and it produces the smallest file. SketchUp's built-in STL export is at
File > Export > 3D Model(choose the STL file type) in the desktop app, or the folder thenExportmenu in the free web app. Both give you a raw mesh file you then have to open in a separate slicer. - 3MF is the modern format that keeps each object as its own entity instead of flattening everything to one mesh, and it carries scale and unit information. Use it when you have several parts on one plate that you want to arrange or assign different filaments to in the slicer.
If you are unsure, send 3MF for multi-part plates and STL for a single solid object. The catch with the manual route is that you then have to open that file in a desktop slicer yourself. The SimplyPrint extension exports both STL and 3MF directly to the browser slicer, so you skip the save-file-then-open-slicer step entirely.
How to 3D print from SketchUp in one click
Here is the modern path. Instead of exporting an STL by hand and importing it into a slicer, you install one extension and press a button. The SimplyPrint extension installs into SketchUp and adds four ways to send a model, then hands it to the browser slicer where there is room for the full settings UI.
The extension is a standard SketchUp .rbz file. The recommended way to install it is straight from the SketchUp Extension Warehouse:
- Open the SimplyPrint listing on the SketchUp Extension Warehouse and click install (you may be asked to sign in to your Trimble account).
- Approve any prompts SketchUp shows for a third-party extension.
- Restart SketchUp. The SimplyPrint toolbar appears and a SimplyPrint submenu is added under the Extensions menu.
Prefer to sideload it? You can also download the .rbz from the SimplyPrint integration page and install it manually:
- In SketchUp, go to
Window > Extension Manager. - At the bottom of the Extension Manager, click Install Extension.
- Select the downloaded
simplyprint.rbzfile and approve SketchUp's prompts. - Restart SketchUp.
Either way you end up with the same extension. After it loads, you get four entry points to send the active model, so you can use whichever fits your habit.
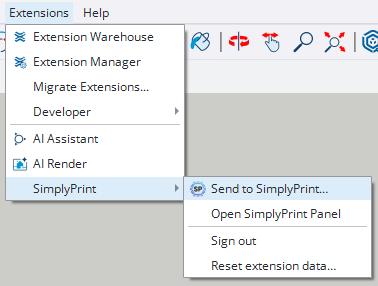
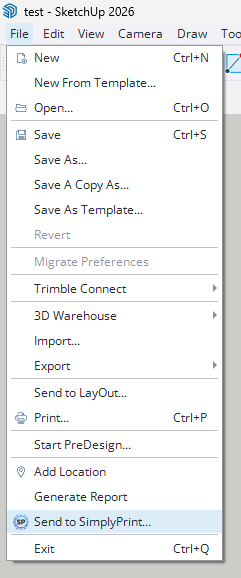
The four ways to send are the SimplyPrint toolbar button, the Extensions > SimplyPrint > Send to SimplyPrint… submenu, a File > Send to SimplyPrint… entry alongside SketchUp's other export options, and a right-click context-menu option on a selection. They all open the same dialog.
The first time you send, click Sign in: a browser tab opens, you approve the request against your SimplyPrint account, and the extension remembers you for future sessions. (That same sign-in is shared with the SimplyPrint Blender and Fusion 360 plugins, so if you already use one of those you are likely signed in already.)
What the Send dialog does
The Send dialog is where the SketchUp-specific gotchas get handled for you. It has three things worth understanding:
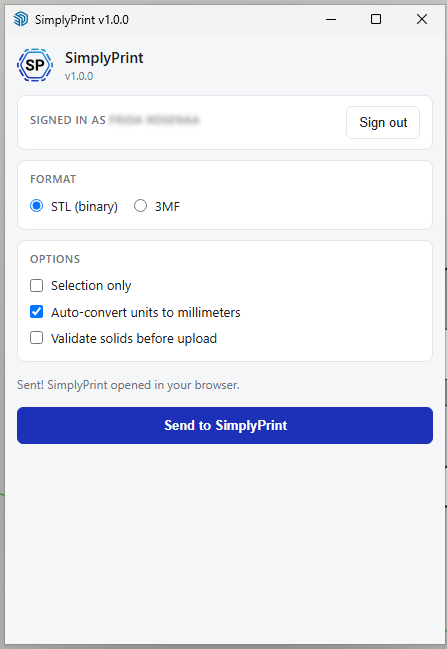
- Format. Pick STL (binary) or 3MF, the same choice covered above. The dialog exports the format you choose; you never touch SketchUp's own export menus unless you want to.
- Selection only. Leave it off to send the whole model, or select the parts you want and tick it to send just those. Handy when one SketchUp file holds several components and you only want to print one.
- Auto-convert units to millimeters. This one matters more in SketchUp than in most CAD tools. SketchUp users very often model in inches or feet, and printers and slicers expect millimeters. With this on, the extension converts units on the way out, so a model you drew in inches arrives at the right physical size instead of being 25 times too small.
- Validate solids before upload. Turn this on and the extension warns you before sending if the geometry is not a closed solid, catching the exact non-manifold problem described at the top of this guide before it wastes a slice. It is the safety net for the Entity Info check.
Hit Send to SimplyPrint and your browser opens with the model loaded in your account, ready to slice, save, or queue. The dialog confirms with a small "Sent! SimplyPrint opened in your browser" message.
Online Cloud-Based Slicer
Use PrusaSlicer, OrcaSlicer, BambuStudio, ElegooSlicer, CrealityPrint & Cura online in the cloud - on any device, anywhere!
What happens after the model lands?
Once the model is in your SimplyPrint account, the browser takes over and SketchUp is done. You slice in the cloud slicer, which runs real OrcaSlicer, PrusaSlicer, BambuStudio, ElegooSlicer, CrealityPrint, and Cura engines in the browser rather than a stripped-down web slicer, so you get the same layer height, infill, support, and brim controls you would get on the desktop. There is nothing to install and nothing to keep updated, which is why this path works just as well on a Chromebook or a locked-down school laptop as on a workstation.
From the slicer you have three onward options, the same three you get from any upload:
- Slice and print now. Send the sliced job to any connected printer, whether that is a Bambu Lab, a Prusa, a Creality, a Voron, or any Klipper, OctoPrint, or Marlin machine.
- Save it to your files. Keep the model and its slice settings in your file library so the next revision is one click away.
- Add it to the print queue. Drop it into the queue and let SimplyPrint dispatch it to the next free printer, which is how print farms and classrooms handle many jobs across many machines.
The whole point is that SketchUp stays a modeling tool and SimplyPrint handles slicing and dispatch. You never export an STL to a folder, never import it into a desktop slicer, and never copy a file to an SD card.
How does this compare to the old SketchUp printing workflow?
The traditional route, the one SketchUp's own help pages and most tutorials describe, still works. It just has more steps and more places to slip.
The manual workflow is fine for a one-off. The extension pays off the moment you iterate, because every design change otherwise means re-exporting, re-importing, and re-checking units by hand. Note that neither route excuses you from the solid-group check. A non-manifold model fails the same way in a desktop slicer as it does in the browser; the difference is that the extension can warn you first.
Where this fits in the bigger picture
The SimplyPrint SketchUp extension is one of several entry points into the same pipeline. If you also model in Blender, you can 3D print from Blender the same way using the SimplyPrint Blender add-on. If you want to understand why 3MF is increasingly the format to reach for, what a 3MF file is and when to use it covers it. And if you want the design-tool-agnostic path, the browser-based slicer accepts any STL or 3MF you drag into it, from SketchUp or anywhere else.
For SketchUp users specifically, the value is simple: get the model solid in SketchUp, where SketchUp is the right tool, then click Send to SimplyPrint and let the browser handle the slice and the printer. No exporter to configure, no desktop slicer to maintain, no SD card. For the full feature list and the install link, see the SketchUp integration page.