To 3D print from FreeCAD you tessellate your parametric solid into a mesh and slice that mesh into G-code, because FreeCAD designs shapes but does not produce printer toolpaths on its own. The fast way to do this in 2026 is the SimplyPrint FreeCAD addon: select your solids in the SimplyPrint dock panel, choose STL, 3MF, or OBJ, and click Send to SimplyPrint. The model opens in the browser slicer with no manual mesh export, no file juggling, and no SD card. That is the short version of how to 3D print from FreeCAD.
This guide covers both paths honestly. First the modern one-click flow with the addon, then the legitimate manual export path through FreeCAD's Mesh workbench (with the surface and angular deviation settings that decide your print quality), so you understand what is actually happening under the one click and can fall back to it whenever you want.
Can FreeCAD 3D print directly, or do you need a slicer?
FreeCAD does not 3D print directly, and no CAD program does. FreeCAD builds parametric solids: B-rep shapes defined by edges, faces, and exact dimensions that survive design changes. A 3D printer does not understand a B-rep solid. It runs G-code, a line-by-line list of nozzle moves and extrusion amounts. The job of turning a solid into G-code belongs to a slicer, not to FreeCAD.
So the real FreeCAD 3D printing pipeline always has three stages, whether you notice them or not:
- Model the part in FreeCAD as a parametric solid (Part or Part Design workbench) or a mesh (Mesh workbench).
- Tessellate the solid into a triangle mesh (an STL, 3MF, or OBJ) so the slicer has a surface to work with.
- Slice the mesh into G-code with a slicer, then send that G-code to the printer.
Most FreeCAD tutorials teach you to do stage 2 and stage 3 by hand: export an STL, open a desktop slicer, slice, save the G-code, then copy it to an SD card or upload it. That works, and we cover it below. But it is several manual steps every time you change a dimension and re-print. The SimplyPrint addon does stages 2 and 3 in one action, with a real cloud slicer doing the slicing.
How to 3D print from FreeCAD in one click
The shortest FreeCAD-to-printer workflow is four moves: install the SimplyPrint addon, log in from the dock panel, tick the objects you want, and click Send to SimplyPrint. The model lands in your SimplyPrint account in the browser, loaded into the slicer and ready to slice, queue, or print on any connected printer.
The addon adds a context-aware SimplyPrint dock panel that adapts to whichever workbench you are in. Pick solids in Part or Part Design, send meshes as-is from the Mesh workbench, or push a whole Assembly as one file. It also installs a dedicated SimplyPrint workbench with its own toolbar and menu, so the Send to SimplyPrint action is one click away from anywhere in FreeCAD.
Compared with the old manual flow, this collapses the export and the slicer-load step into a single click while keeping the slicer settings in the browser where there is room for them. You stay in FreeCAD for the part that FreeCAD is good at (precise parametric modeling) and move to the browser for the part SimplyPrint is good at (slicing and dispatch).
Online Cloud-Based Slicer
Use PrusaSlicer, OrcaSlicer, BambuStudio, ElegooSlicer, CrealityPrint & Cura online in the cloud - on any device, anywhere!
How to install the SimplyPrint FreeCAD addon
There are two ways to install the addon. The Addon Manager is the recommended path because it handles updates for you; the manual zip install is there for offline machines or locked-down setups.
Option 1: FreeCAD Addon Manager (recommended)
- In FreeCAD, open Tools then Addon Manager.
- Search for SimplyPrint in the list and click Install.
- Restart FreeCAD. The SimplyPrint dock panel and workbench appear.
That is the whole install. The Addon Manager is FreeCAD's built-in package installer, so the addon updates the same way any other community addon does. If you have never used it before, FreeCAD's own Addon Manager documentation walks through the interface.
Option 2: Manual zip install (Windows, macOS, Linux)
If your FreeCAD machine cannot reach the Addon Manager (an air-gapped lab, a managed school device, a Flatpak sandbox), install the addon by hand:
- Download the zip from the SimplyPrint FreeCAD integration page.
- Find your user Mod folder. Open FreeCAD's Python console (View then Panels then Python console) and run
App.getUserAppDataDir(). The addon goes in theModsubfolder of the path it prints. - Extract the zip into that folder so you end up with a
Mod/SimplyPrint/directory. - Restart FreeCAD.
The result is identical to the Addon Manager install: the dock panel and workbench appear after the restart. The only difference is that manual installs do not auto-update, so you re-download the zip when a new version ships.
Send your first model: pick objects, format, and quality
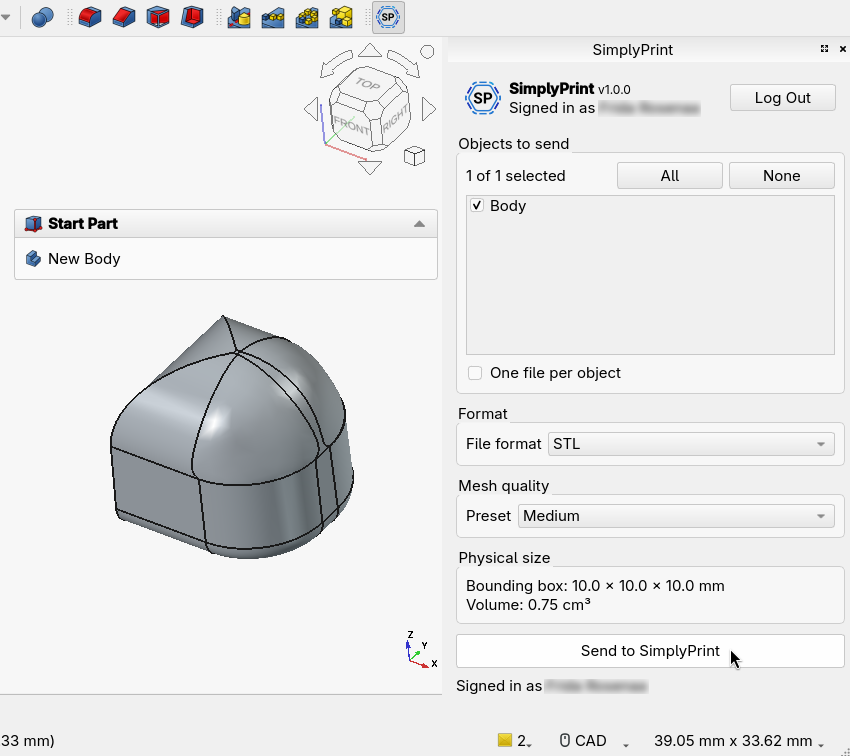
With the addon installed and signed in, open or model something with solids or meshes. The dock panel lists the objects it found, the mesh-quality options for solids, and the real bounding box and volume so you can sanity-check the size before anything leaves FreeCAD.
The panel gives you three decisions before you send:
- Which objects. Tick the solids, meshes, or assemblies you want to print. You can send a multi-object selection as separate files, or push a whole assembly as one file. For big assemblies the upload is chunked so it does not choke on a large model.
- Which format. STL, 3MF, or OBJ (covered in detail below).
- Which mesh quality. Low, Medium, or High presets, or fine-tune the surface deviation in millimeters and the angular deviation in degrees. This is the single biggest lever on how smooth your curved surfaces come out.
Then click Send to SimplyPrint. Your browser opens SimplyPrint with the file loaded, ready to slice, queue, or print on one or more printers.
Which export format should you choose?
The format choice changes what the slicer receives, not just the file extension.
- STL is the universal format. It is a plain triangle mesh with no units metadata, no material info, and everything flattened into one shell. Use it for a single-material, single-object print. It is the most compatible format with every slicer ever made, and the smallest of the three.
- 3MF is the modern format. It preserves real-world units (so a 40 mm part stays 40 mm), keeps each object as its own entity instead of flattening them, and can carry per-object positioning. Use 3MF for multi-part files, assemblies, or anything where you want to assign different filaments to different objects. The cloud slicer treats 3MF as the recommended format for any non-trivial scene.
- OBJ carries materials and UVs. For a one-material print it is no better than STL, but it is useful when the same file also feeds a rendering or texturing pipeline that cares about materials.
If in doubt: STL for one simple part, 3MF for everything else.
The manual path: how to export STL from FreeCAD yourself
You do not have to use the addon. Understanding the manual FreeCAD export STL workflow is worth it, because it is exactly what the addon automates, and because there are times (offline machine, a slicer you want to keep using locally) when you will reach for it.
A FreeCAD solid is a perfect mathematical surface. An STL is a triangle approximation of that surface. The whole game in the FreeCAD to STL conversion is controlling how closely the triangles follow the real shape. Here is the flow:
- Select the solid in the tree (a Part or Part Design body).
- Switch to the Mesh workbench from the workbench dropdown.
- Tessellate it. Use Meshes then Create Mesh from Shape. A dialog asks for the meshing parameters, and this is the part that decides your print quality.
- Tune the deviation. Surface deviation is the maximum distance (in millimeters) a triangle is allowed to sit from the true surface. Angular deviation is the maximum angle between adjacent triangles. Lower both for smoother curves; a surface deviation around 0.01 to 0.1 mm is a good FDM range. Too coarse and you get visible faceting on cylinders and fillets; too fine and you get a huge file that slices slowly for no visible benefit at typical layer heights.
- Export the mesh. Select the new mesh, then Meshes then Export Mesh and choose STL, 3MF, or OBJ.
- Open it in your slicer (OrcaSlicer, PrusaSlicer, BambuStudio, or the SimplyPrint browser slicer), slice, and send the G-code to the printer.
FreeCAD's own wiki page on exporting to STL or OBJ covers the dialog in full detail. The one thing worth repeating: FreeCAD models in millimeters by default, which is exactly what every slicer expects, so as long as you have not imported a part built in inches your units will line up.
Why slice in the browser instead of a desktop slicer?
Once the geometry is out of FreeCAD, something has to slice it. You can use a desktop slicer, or you can slice in the browser. The browser path removes the install-and-maintain overhead and keeps the whole loop on one machine.
The SimplyPrint cloud slicer runs the same engines you would install on the desktop: OrcaSlicer, PrusaSlicer, BambuStudio, ElegooSlicer, and CrealityPrint, your choice, running server-side and streamed into the browser. You set layer height, infill, supports, and the rest in a familiar slicer UI, then print to a connected printer or drop the job in your queue. Nothing to download, nothing to keep up to date, and it runs the same on a workshop PC, a laptop, or a locked-down school Chromebook.
If your job needs something the browser slicer does not expose, you always have the manual export above as a fallback. For the everyday FreeCAD-to-print loop, the browser path is fewer steps and one less program to maintain.
Does it work with my printer?
Yes. SimplyPrint works with any printer you connect to it: 130+ brands and 600+ models, through OctoPrint, Klipper, or a built-in integration. The FreeCAD addon does not care what printer you own; it hands the geometry to SimplyPrint, and SimplyPrint dispatches the sliced job to whatever you have connected (a Bambu Lab printer, a Prusa, a Creality, a Voron, or a Klipper machine).
The addon is also platform-agnostic on the FreeCAD side. It runs on Windows, macOS, and Linux, including native and Flatpak builds, because it installs through FreeCAD's own Addon Manager or a copy into your user Mod folder. The same install works for a hobbyist on a laptop, a school running managed Linux machines, and a print farm operator on a workshop PC.
Where this fits in the bigger picture
The point of the SimplyPrint FreeCAD addon is to delete the manual export-and-load step that sits between a parametric solid and a sliced print. Once the model is in your account, the rest of the platform takes over: the browser slicer handles the slice with real OrcaSlicer or PrusaSlicer engines, your file library stores it for the next revision, and the print queue dispatches it to the right printer. After a design change you edit the dimension in FreeCAD, click Send to SimplyPrint, slice, and print again, no SD card in the loop.
FreeCAD is the right tool for precise mechanical parts: brackets, enclosures, gears, fixtures, anything where a tenth of a millimeter matters and the design will change. (For organic or sculpted shapes, a mesh tool like Blender fits better, which is why we have a separate guide on how to 3D print from Blender.) Whichever tool you model in, the downstream flow is the same, and the FreeCAD addon is one of several entry points into it. If you want to understand the file in the middle of all this, read what a 3MF file is, and for the slicing side, browser-based 3D slicing explains why the slicer lives in a tab instead of an installer.
For FreeCAD users specifically, the value is simple: stay parametric in FreeCAD, slice in the browser, and never hand-export an STL again unless you choose to. Open the dock panel, tick your solids, and click Send to SimplyPrint.