You can 3D print from Blender by installing the SimplyPrint Blender add-on, designing your model, then pressing N in the 3D viewport and clicking Send to SimplyPrint. The add-on exports STL, OBJ, or 3MF, hands the file to your SimplyPrint account, and from there you slice in the browser, queue it, or push it straight to a connected printer. The whole loop happens without leaving Blender for the export and without leaving the browser for the slice. That is the short version of how to 3D print from Blender in 2026.
This guide walks through that flow end-to-end: how to install the SimplyPrint add-on (it is not on the official Blender Extensions platform, so you install it manually), how to send a model from the N panel, how to fix common Blender-to-print geometry issues with Blender's own bundled 3D Print Toolbox, and the three Blender-specific gotchas (units, scale, modifiers) that cause more failed Blender prints than anything else.
How to 3D print from Blender, end to end
The shortest version of the Blender to printer workflow is four moves: install the SimplyPrint add-on in Blender, model your part as usual, press N in the 3D viewport, and click Send to SimplyPrint. The model lands in your SimplyPrint account where you choose whether to slice it now in the browser, save it for later, or push it straight to the print queue. From there a connected printer (Bambu Lab, Prusa, Creality, Voron, Klipper, or anything SimplyPrint can talk to) receives the sliced job and starts printing.
If you have searched for "Blender 3D printing" tutorials before, you have probably ended up at "click File > Export > STL, then open the file in your slicer". That works, but it is two extra steps every single time you iterate on a model. The Blender SimplyPrint add-on collapses the export and the slicer-load step into one click, while keeping the slicer settings UI in the browser where there is room for it. Everything else in this guide is the longer version of those four moves.
Is Blender good for 3D printing?
Blender is excellent for 3D printing if your models are organic, sculpted, or artistic: tabletop miniatures, character busts, jewelry blanks, light fixtures, decorative wall pieces, prosthetics, scanned mesh cleanup, and anything where the shape is what matters and a tenth of a millimeter does not. Blender's modifiers, sculpting tools, and procedural geometry nodes give you tools no parametric CAD package can match for that work.
For mechanical parts that need exact tolerances (a snap-fit case for a Raspberry Pi, a printed bracket that has to bolt to existing hardware, a gear that meshes with a known module), Blender is the wrong tool. Reach for Fusion 360, FreeCAD, or Onshape for those: parametric CAD gives you sketch-based dimensions that survive design changes. Blender meshes do not.
A useful rule of thumb: if you can draw the part on graph paper with a ruler, use parametric CAD. If you would rather sketch it in clay, use Blender. The Blender add-on is built for the second case.
Install the SimplyPrint Blender add-on
The SimplyPrint Blender add-on is published on the SimplyPrint integration page, not on the official Blender Extensions platform. (Blender's extension policy currently does not list cloud services and SimplyPrint is a cloud service, so the extension lives on our own site instead.) The install path is Blender's standard "Install from Disk" flow, which works the same on Windows, macOS, and Linux.
- Download the add-on. From the SimplyPrint Blender integration page, click Download. You get a
simplyprint.zipfile. Do not unzip it; Blender installs the zip directly. - Open Blender preferences. In Blender, go to
Edit > Preferences > Add-ons. - Install from disk. Click the dropdown arrow in the top-right of the Add-ons tab, then
Install from Disk....
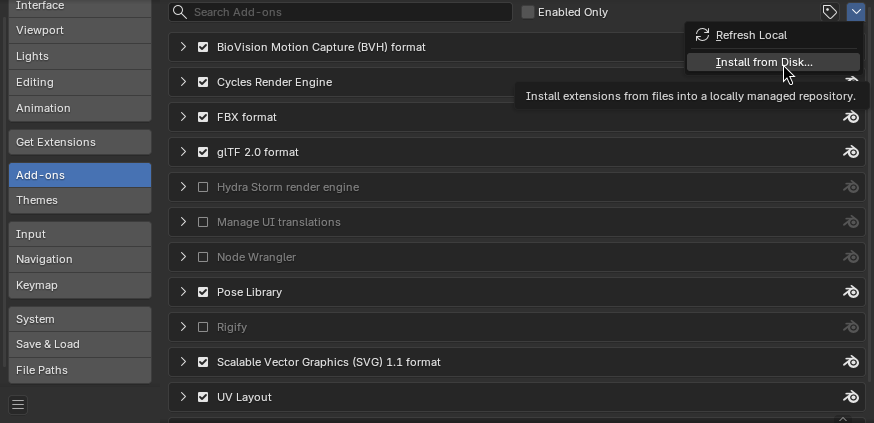
- Pick the zip you downloaded. Find
simplyprint.zipin your downloads folder and select it. - Enable the add-on. Blender usually enables the add-on automatically after install. If it does not, find SimplyPrint in the add-on list and tick the checkbox next to it.

That is the whole install. There is no system-level component, no separate runtime, and no companion app to keep running in the background. Everything happens inside Blender and the browser tab the add-on opens when you log in.
Send your first model: export, queue, or print
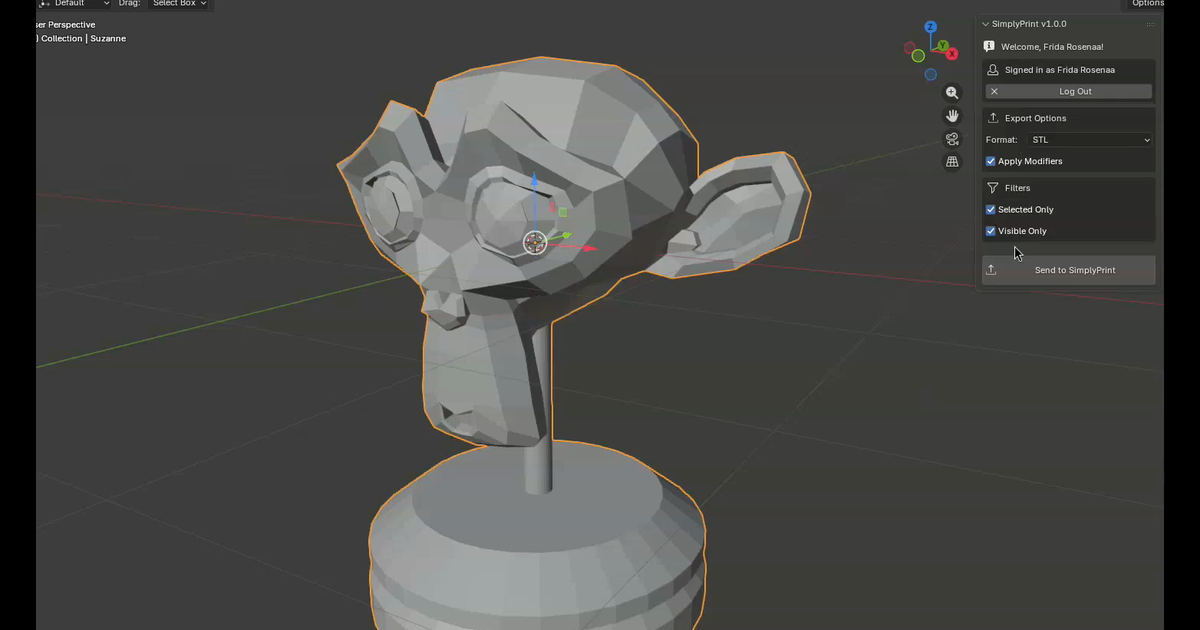
Once installed, press N in the 3D viewport to open Blender's side panel. The SimplyPrint tab appears alongside the standard Item, Tool, and View tabs. Click it to see the add-on UI.
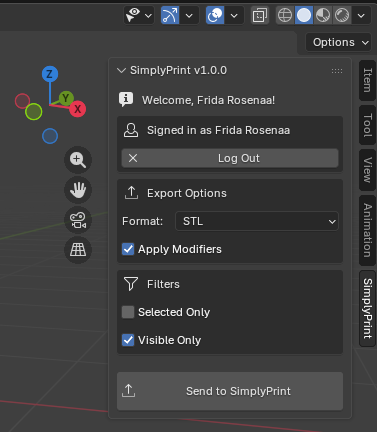
The panel has four useful controls:
- Login. Click
Log Inand Blender opens a browser tab where you authorise the add-on against your SimplyPrint account. Once authorised, the panel remembers you between sessions. - Export format. STL, OBJ, or 3MF. Pick the right one for the job (more on that below).
- Apply modifiers. Whether Blender bakes your modifier stack into the exported geometry. Leave this on for most prints. Turn it off only when you want to export the underlying base mesh and slice the modifier result yourself.
- Object filters. Selected Only and Visible Only let you ship a subset of the scene. Useful when one Blender file holds variants you do not want to print together.
Hit Send to SimplyPrint. The model goes to your SimplyPrint account, and a browser tab opens with three options: save the file, slice it now, or add it to the print queue. The same three-way landing you get from the Tinkercad integration, the Fusion integration, or a manual upload.
You can also reach the same export flow from Blender's top menu: File > Export > SimplyPrint opens an export modal with the same controls as the N-panel, which is handy when you are already in the File menu doing other exports.
Online Cloud-Based Slicer
Use PrusaSlicer, OrcaSlicer, BambuStudio, ElegooSlicer & CrealityPrint online in the cloud - on any device, anywhere!
Choose the right export format
The format choice is not just preference; it changes what the slicer sees.
- STL is the universal format. Triangulated mesh, no material info, no per-object metadata. Use it for single-material prints where the only thing that matters is the geometry. Smallest file size of the three.
- OBJ carries material assignments and UVs. The SimplyPrint cloud slicer does not currently use OBJ materials for slicing decisions, so for a one-material print STL is just as good. OBJ is useful when you are also sending the file to a non-slicer pipeline that does care about the material info.
- 3MF is the modern format that carries each object as its own entity (rather than flattened to one mesh), plus per-object scale and orientation. Use 3MF when you have multiple objects on the build plate that you want to position independently in the slicer, or when you plan to assign different filaments to different objects (multi-material). The cloud slicer treats 3MF as the recommended format for any non-trivial scene.
If in doubt, send 3MF. The cloud slicer handles all three; 3MF gives the slicer the most to work with.
Watch the round trip
The 50-second product demo shows the full Blender to printer round trip: log in, select the model, pick the format, send to SimplyPrint, land in the browser, slice, print.
Fix the geometry before you print: Blender's 3D Print Toolbox
Most "Blender export STL" guides skip this step, and it is the single highest-leverage improvement you can make to your Blender prints. Blender ships with a first-party 3D Print Toolbox add-on, often just called the Blender 3D Print Toolbox, that checks your mesh for the geometry problems slicers cannot recover from. It is bundled with every Blender install, just not enabled by default.
Enable it: Edit > Preferences > Add-ons, search for 3D Print Toolbox, tick the checkbox. A new "3D-Print" tab appears in the N panel next to the SimplyPrint tab.
The toolbox runs five useful checks on your selected mesh, and each one maps to a real-world print failure:
- Solid. Are all the faces forming a closed volume? Holes in the mesh make the slicer guess at the interior, and it usually guesses wrong, producing prints with missing layers or sliced-away shells.
- Intersections. Do faces pass through each other? Slicers will print the intersected region twice, doubling the extrusion and producing a blob.
- Degenerate. Zero-area faces and zero-length edges. Slicers either ignore these (best case) or hang on them (worst case).
- Distorted. Faces that are not flat. A few are fine; many will cause normals to flip during slicing and produce inside-out walls.
- Thickness. Walls thinner than your nozzle size. The slicer treats sub-nozzle walls as zero-thickness and skips them, so what you see in Blender is not what comes out of the printer.
The Overhangs check is the most useful for sculpted models: it flags any face steeper than your set angle (default 45 degrees), so you know exactly where the model will need support before you slice. Fix the steep overhangs in Blender (a small rotation, a chamfer, a support pad) and you can often print support-free.
The Make Manifold button in the same panel tries to auto-fix common geometry problems (closing tiny holes, removing internal faces, merging overlapping vertices). It is not a magic wand, but on a Blender mesh that has been through booleans or modifier stacks, it cleans up enough to get the file into the slicer without further work.
Run the toolbox before you click Send to SimplyPrint. The model that arrives in the slicer will be cleaner, slice faster, and print more reliably.
Scale, units, and modifiers: the top three Blender gotchas
Blender's defaults are tuned for animation and rendering, not 3D printing. Three settings cause more confusion than anything else when sending Blender models to a printer.
1. Set scene units to millimeters
Blender's default unit is the meter, and the default cube is 2 meters on a side. A slicer reading a 2 meter cube will either fail outright (no printer with a 2 meter build plate) or, worse, scale it down silently in unpredictable ways. Set Scene Properties > Units > Unit System: Metric, Unit Scale: 0.001, Length: Millimeters and Blender will display dimensions in millimeters from then on. Existing geometry does not change size; only the display unit changes. Re-build your model to the correct millimeter dimensions after switching.
2. Apply scale before export
Even with units set correctly, an object that has been resized using S keeps its visual size but stores a non-unit scale factor on the object (you can see it in the N panel under Item > Scale). The slicer reads the underlying mesh data, not the displayed bounding box, so an object scaled to 2x will arrive in the slicer at half the size you see in Blender.
The fix is one keystroke. With the object selected, press Ctrl+A > Scale. Blender bakes the visible scale into the mesh data and resets the scale factor to 1.0. From that point on, what you see in Blender is what arrives in the slicer.
3. Apply modifiers (or check Apply Modifiers in the SimplyPrint panel)
Blender modifiers (Subdivision Surface, Mirror, Boolean, Array, and so on) are non-destructive: they alter what you see, but the underlying mesh data is unchanged. Export an STL of an unsubdivided cube with a Subdivision Surface modifier and you get the cube, not the smooth sphere you were looking at.
Two options:
- Apply each modifier before export. With the object selected, hover over the modifier in the properties panel and press
Ctrl+A. The modifier collapses into the mesh. - Leave Apply Modifiers ticked in the SimplyPrint N panel. The add-on applies the modifier stack at export time, so the file SimplyPrint receives is the geometry you see in the viewport.
The second option is the default and is what you want for most prints. The first option is useful if you want to commit the modifier permanently or check the result manually.
Best practices for printable Blender geometry
Beyond the unit and scale gotchas, the geometry itself has to be slicer-friendly. The short list of what makes Blender geometry print well:
- Solid manifold. Every edge should be shared by exactly two faces. The 3D Print Toolbox's Solid check catches violations.
- Outward normals. Slicers use face normals to decide inside vs outside. Flipped normals produce inside-out walls. Select all in edit mode and press
Shift+Nto recalculate normals outward. - No internal faces. Booleans sometimes leave faces inside the solid. The slicer happily prints them as extra walls. The Make Manifold button removes most.
- Quads or triangles, not n-gons in load-bearing areas. N-gons (faces with more than 4 vertices) export to STL as a triangle fan that often comes out non-planar. Apply a triangulate modifier before export if your model has many n-gons.
- Even topology in thin regions. Long thin walls with sparse vertices produce slicing artifacts. A loop cut or two costs nothing and improves print quality on text, fine ridges, and embossed detail.
- Watertight enclosures around hollow regions. If you want to print a hollow object, model the inner shell as a separate watertight volume rather than relying on the slicer's infill density.
None of this is unique to printing through SimplyPrint; it is the same baseline that any slicer wants. The benefit of running the 3D Print Toolbox before sending is that you catch all of these in Blender, where they are cheap to fix, rather than after a failed three-hour print.
What the SimplyPrint Blender add-on does not yet do
Honest list of where the add-on stops, so you can plan around it:
- No slicer settings per-object inside Blender. You set layer height, infill, and supports in the SimplyPrint slicer after the model arrives, not in the Blender panel. If you want per-object slicer overrides on a multi-object scene, send 3MF and assign the overrides in the browser slicer once the model lands.
- No multi-material tagging from inside Blender. Multi-material assignment happens in the slicer too. The add-on sends the geometry; the slicer is where you pick which extruder, AMS lane, or material spool prints which object.
- No live job-status sync into the Blender panel. Once you have sent the model, monitoring (print progress, camera feed, AI failure detection alerts) happens in the SimplyPrint browser panel or the SimplyPrint mobile app, not inside Blender. The control panel gives you the live view of every connected printer.
- No direct push to Bambu Lab printers without the SimplyPrint Bambu Lab Client. Bambu Lab printers connect to SimplyPrint via the local SimplyPrint Bambu Lab Client, a small app you run on a Raspberry Pi or always-on computer on the same network as the printer (setup guide). If the client is running, the Bambu Lab printer shows up like any other and the Blender add-on can send to it; if it is not, the printer is not visible to send to.
If any of those gaps matter for a specific job, slice that one in a desktop slicer and use SimplyPrint for everything else. For the typical Blender to print workflow (model in Blender, send, slice in browser, print on a connected printer), the gaps are negligible.
Where this fits in the bigger picture
The point of the SimplyPrint Blender add-on is to remove the manual export step that sits between Blender and a sliced print. Once the model is in your SimplyPrint account, the rest of the platform takes over: the cloud slicer handles the slice, your file library stores it for next time, the print queue dispatches it to the right printer, and the one-click print flow sends it to the bed without another click-through. From that point, monitoring runs through the SimplyPrint browser panel, the mobile app, or AI failure detection on the camera feed.
If you also send models from other tools (CAD, the cloud slicer in a browser tab, a Chromebook, an iPad), the same downstream flow applies. The Blender add-on is one of several entry points into the same pipeline: see how to slice on a Chromebook for the design-tool-agnostic browser path, how to 3D print directly from Tinkercad on a Chromebook for the classroom CAD path, and how to add AI failure detection to any 3D printer for what happens once the print is actually running.
For Blender users specifically, the value is that you stay in Blender for the modeling part (where Blender is the right tool) and the browser for the slicing part (where SimplyPrint is). No SD card, no USB stick, no second machine to keep a slicer installation up to date. Press N, click Send to SimplyPrint, and the model is on its way.