If you want to slice on a Chromebook in 2026, you have two real options: enable a Linux container and try to install a desktop slicer (slow and often disabled by school IT), or use a browser-based cloud slicer like SimplyPrint, OrcaSlicer's online build, or BambuStudio online. The cloud path is faster, works on every Chromebook regardless of spec, and gives you the same engines, profiles, and settings you would have on desktop.
This guide walks through exactly how to slice STL or 3MF files on a Chromebook, why the desktop slicers do not work, and how to set up a classroom workflow where every student can slice from their own browser. By the end you will have a working Chromebook 3D slicer setup with no installation and no compromise on settings.
How do you slice on a Chromebook in 2026?
You slice on a Chromebook by uploading your STL or 3MF file to a cloud slicer that runs the engine on a server and streams the result back to your browser. SimplyPrint's online slicer for Chromebook supports OrcaSlicer, PrusaSlicer, BambuStudio, ElegooSlicer, and CrealityPrint with their full settings. There is no Linux container, no install, and no minimum hardware: any browser-capable Chromebook can slice.
If you have already tried "Orca Slicer Chromebook" or "Bambu Studio Chromebook" searches and ended up at desktop installers that did not work, that is the gap this guide closes.
Why desktop slicers do not work on a Chromebook
Chrome OS does not run native Windows, macOS, or Linux applications by default. Some Chromebooks support a Linux container ("Crostini") that can install desktop slicers, but in most school deployments IT has disabled this for security reasons. Even when Crostini is enabled, performance on lower-spec Chromebooks is poor - slicing a moderately complex model can take several minutes and crash the container.
The straightforward fix is to move slicing off the Chromebook entirely. Cloud slicers run the slicing engine on a server and stream the result back as a downloaded G-code file or a print-ready job sent directly to a printer.
Use the SimplyPrint cloud slicer
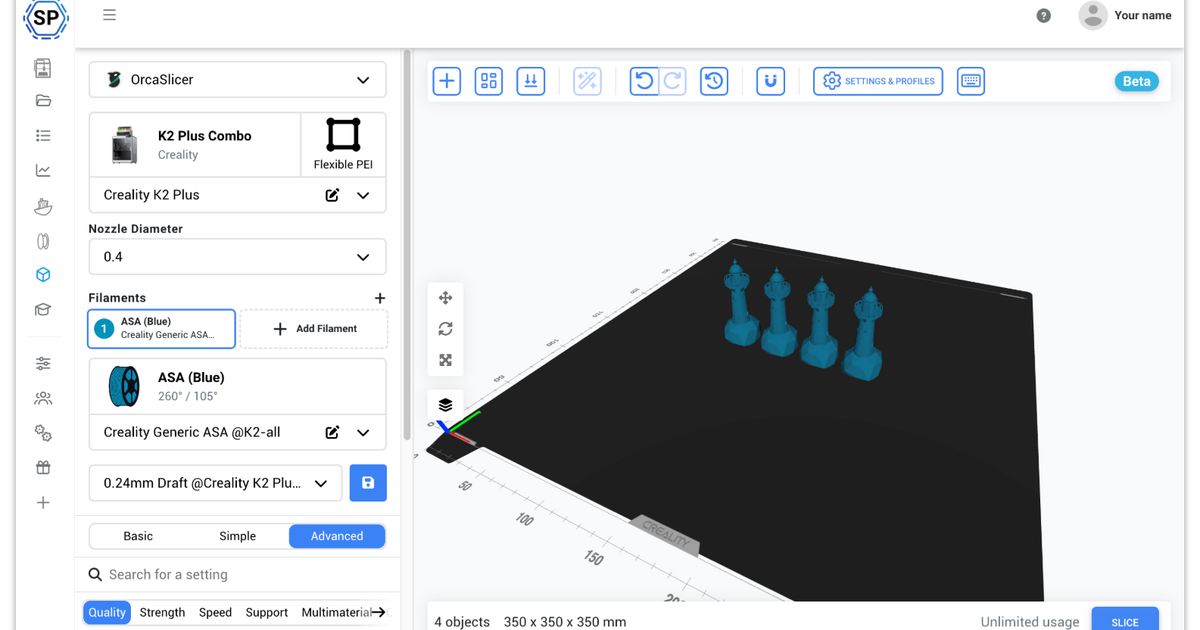
SimplyPrint runs unmodified open-source slicer engines (the same ones you use on desktop) on our cloud servers. You upload an STL or 3MF, pick the engine and printer profile, click slice, and the result comes back to the browser. Everything runs on the server side, so your Chromebook only needs a working browser - RAM and CPU do not matter.
Online Cloud-Based Slicer
Use PrusaSlicer, OrcaSlicer, BambuStudio, ElegooSlicer & CrealityPrint online in the cloud - on any device, anywhere!
The currently supported engines are:
- OrcaSlicer - the most popular community slicer in 2026, especially for Bambu Lab and modded printers
- PrusaSlicer - Prusa's official slicer, well-documented, broad printer profile coverage
- BambuStudio - Bambu Lab's official slicer, required for AMS multicolor and the X1/P1/A1 series
- ElegooSlicer - Elegoo's official slicer (an OrcaSlicer fork), with native profiles for the Centauri Carbon, Centauri Carbon 2 and Neptune series
- CrealityPrint - Creality's official slicer (also an OrcaSlicer fork), with native profiles for the K2, Ender and Creality CoreXY range
All five are kept up-to-date with their upstream releases, and all settings, profiles, and slicing modes from the desktop version are present.
Step-by-step: slice your first file on a Chromebook
- Sign up for a free SimplyPrint account. No credit card needed for the free tier.
- Open the slicer. From the panel, go to Files → upload an STL or 3MF, then right-click the file and choose "Slice with...".
- Pick your engine and printer profile. SimplyPrint ships with profiles for thousands of printers; pick yours, or import a profile you have tuned at home (PrusaSlicer .ini files, Orca/Bambu .json profiles).
- Adjust settings as needed. All the standard layer height, infill, support, and adhesion settings are there, plus advanced settings tucked behind a toggle for power users.
- Click slice. The job runs on our servers; you see progress in the browser.
- Print, queue, or download. When slicing finishes, send the result directly to a connected printer, add it to a queue group, or download the G-code if you want to USB it over to a printer that is not connected to SimplyPrint. If your Chromebook only has USB-C ports, a dual USB-C and USB-A thumb drive bridges the gap to a printer's USB-A port.
Run a Chromebook classroom: shared profiles and student permissions
Classrooms have a different problem: 25 students, 25 Chromebooks, 4 printers, and a teacher who does not want to debug everyone's settings. SimplyPrint's multi-user features are built for this:
- Shared printer profiles mean every student starts from the same baseline. Students cannot accidentally print at 0.05 mm layer height with 100% infill on a queue with a 30-minute timer.
- Permissions let a teacher restrict which slicing settings students can change. Lock everything except print quality and infill, and you have a workflow students cannot break.
- A shared print queue routes student submissions through teacher approval before reaching the printer.
What the cloud slicer cannot do (yet)
To be transparent: the cloud slicer is in active development and a few desktop features are not yet available. As of mid-2026, the gaps are:
- Some text-generator and object-manipulation features that depend on desktop OpenGL behavior
- Direct integrations with model repositories (Makerworld, Printables) - you can still download an STL and upload it manually
If you depend on any of these, slice that specific job on a desktop machine and use SimplyPrint for everything else. For the typical classroom or hobbyist workflow, the gaps are negligible.
Privacy and licensing
SimplyPrint uses the official open-source slicer engines via their published CLI interfaces, in full compliance with their AGPL-3.0 licenses. We have contributed back to the upstream projects and publish our slicer-build process publicly at github.com/SimplyPrint/slicer-builds, alongside maintainers like the PrusaSlicer team, OrcaSlicer, and ElegooSlicer. Your STL files are processed in our EU data centers, kept encrypted at rest, and are not used for training any model. For schools, we have a signed DPA available on request.
What this means for schools and Chromebook users
If you are running a Chromebook lab and have been telling students "you cannot slice here, do it at home", you no longer need to. The cloud slicer turns any browser into a full slicing station with the same engines, the same profiles, and the same output. Setup takes about ten minutes; ongoing maintenance is roughly zero.
For everyone else: if you have a Chromebook and have been considering buying a Windows laptop just to run a slicer, that is no longer necessary either. Your Chromebook is the slicer.