If you want to 3D print directly from Tinkercad on a Chromebook in 2026, you do not need to download anything, enable Linux, or move STL files between machines. Tinkercad has a built-in Export option that sends your design straight to SimplyPrint (sign in to SimplyPrint once and the integration remembers you), where the cloud slicer runs OrcaSlicer, PrusaSlicer, BambuStudio, ElegooSlicer, CrealityPrint, and Cura in your browser and the result can be queued or printed on a connected 3D printer. The entire chain (design, slice, print) runs in the Chromebook browser with nothing installed.
This guide walks through that flow end-to-end: where to click in Tinkercad, what to choose in SimplyPrint, how the workflow holds up in a classroom with 25 students sharing four printers, and what the browser-only path still cannot do.
How do you 3D print directly from Tinkercad on a Chromebook?
You open your Tinkercad design, click Export in the top right, choose 3D Print and then SimplyPrint. SimplyPrint receives the model in your account and gives you three options: save the file for later, slice it now, or add it directly to the print queue. Slicing happens on SimplyPrint's servers, so your Chromebook does no heavy lifting. When the slice finishes, you send the print to a connected printer with one click.
If you have already tried "Tinkercad Chromebook 3D print" searches and ended up at desktop-only guides or shaky USB workflows, that is the gap this guide closes. The Tinkercad to SimplyPrint integration is the missing browser-native link between cloud CAD and a real printer, and right now it is the cleanest way to 3D print on Chromebook from browser without an installer of any kind.
Why this matters for school Chromebooks
School-issued Chromebooks are usually locked down by IT. The Linux container ("Crostini") that would let you install a desktop slicer like Cura or PrusaSlicer is often disabled, and even when it is enabled, slicing a moderately complex model on a 4 GB Chromebook can take several minutes and crash the container. Asking students to slice at home and bring a USB stick is the standard fallback, and it breaks the lesson.
A browser-only workflow sidesteps all of that. Tinkercad runs in the browser. SimplyPrint runs in the browser. The printer is connected to SimplyPrint's cloud, not the Chromebook. From IT's perspective, there is nothing new to install, no permissions to relax, and no USB devices to allow. From the teacher's perspective, every student can go from "I just finished my model" to "it is printing" without leaving the Tinkercad tab.
Step by step: send a Tinkercad design to a printer from your Chromebook
This is the same flow on any Chromebook, in any browser. The screenshots below were captured on Chrome on Chrome OS, but Firefox and Edge work identically.
1. Open the Tinkercad design you want to print
In your Tinkercad dashboard, click into the design. For this walkthrough we are printing a simple text model so the steps are easy to follow.
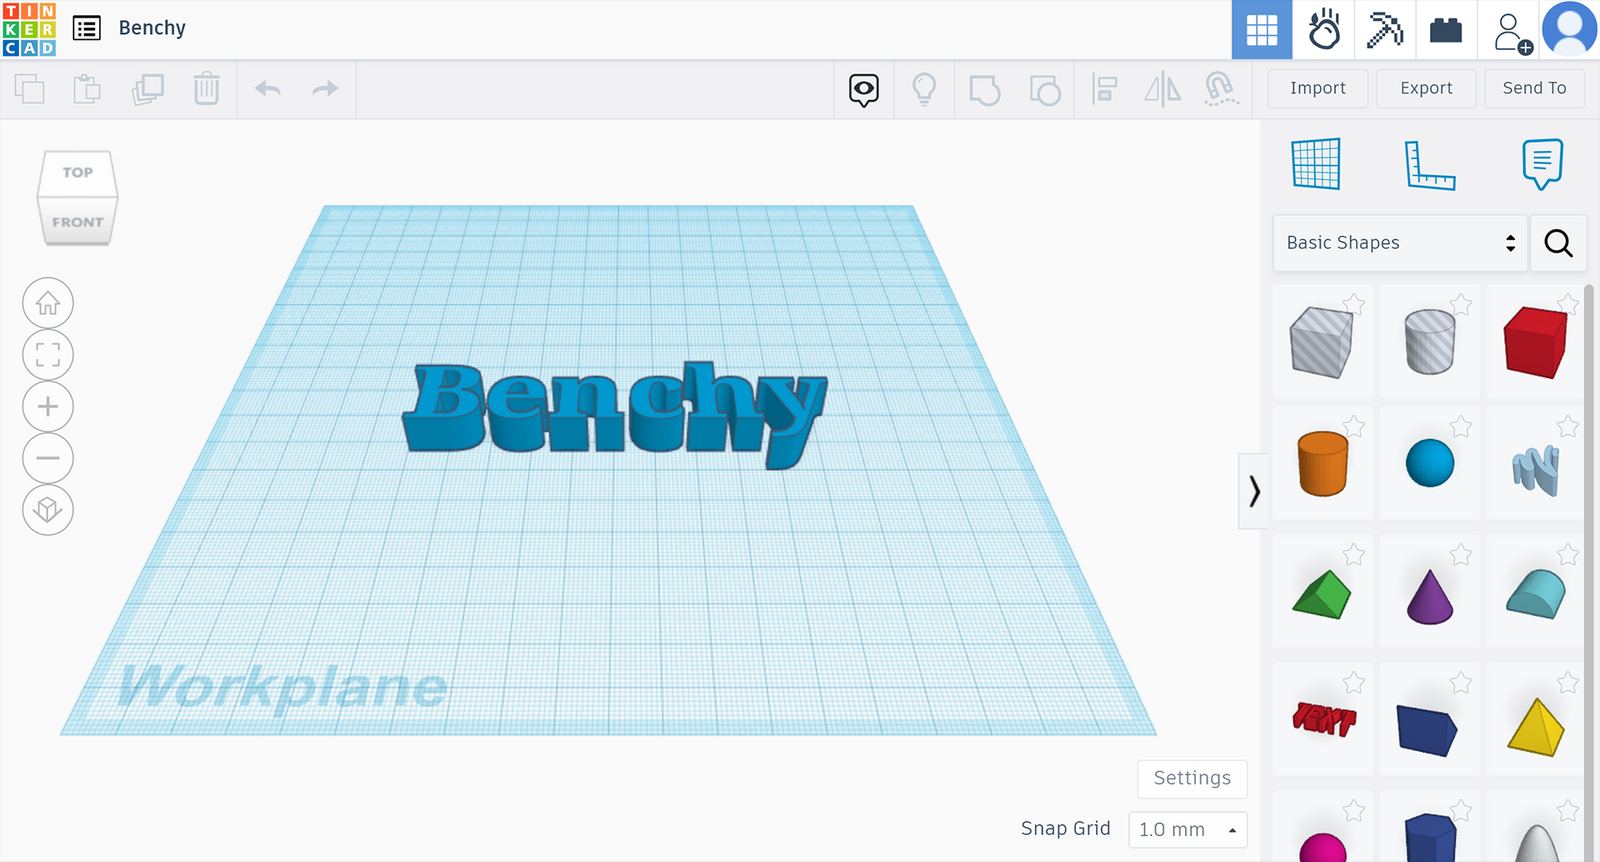
2. Click Export in the top right corner
The Export button is in Tinkercad's top toolbar. This is the same button you would use to download an STL or OBJ, but the SimplyPrint flow does not require a download at all.
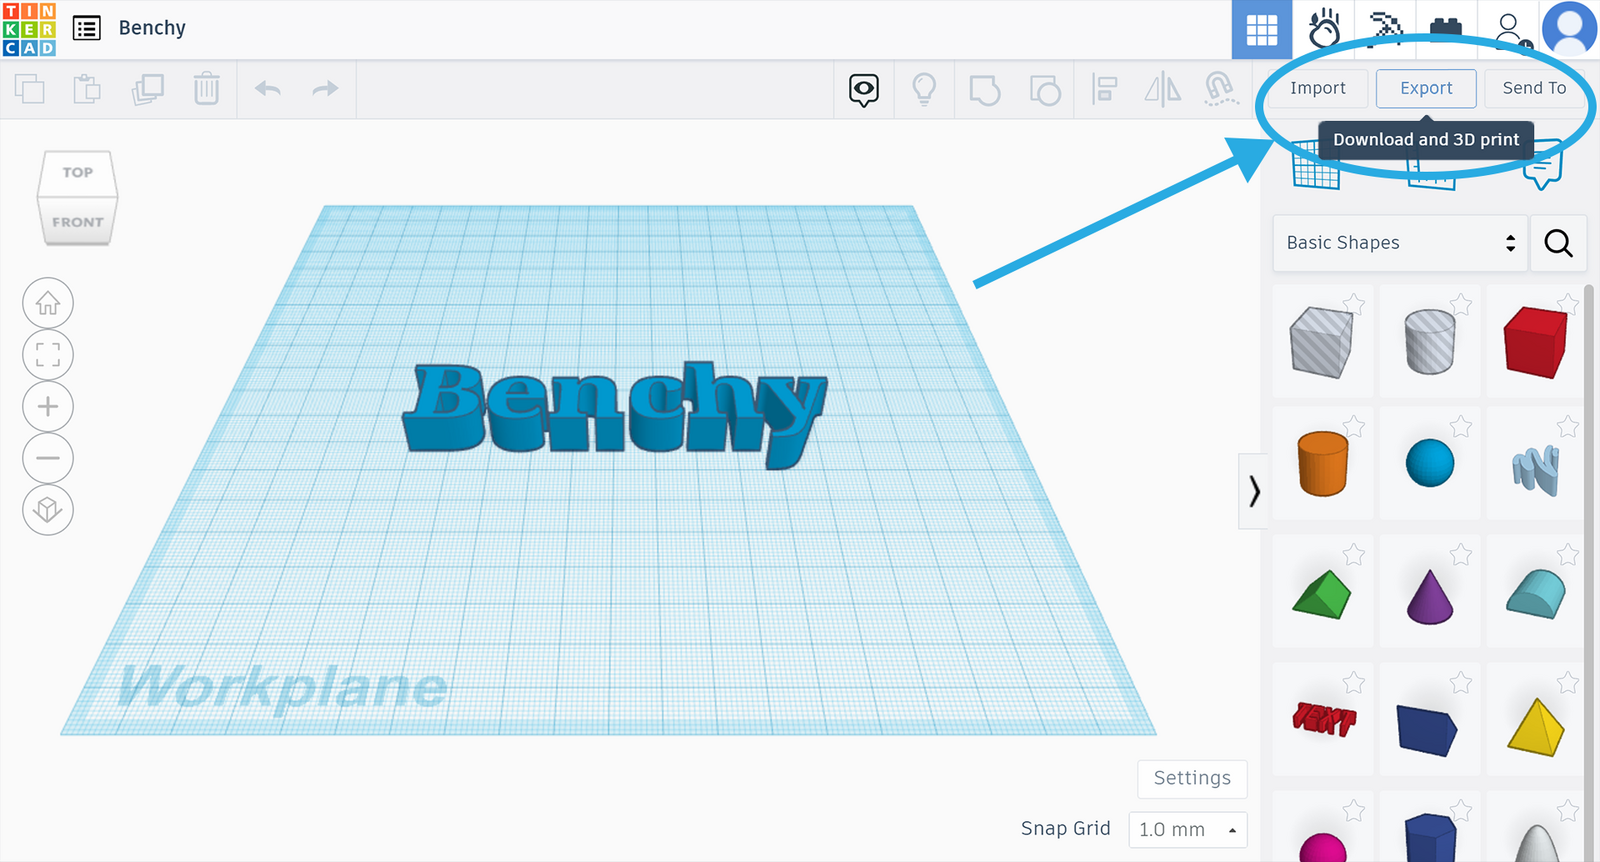
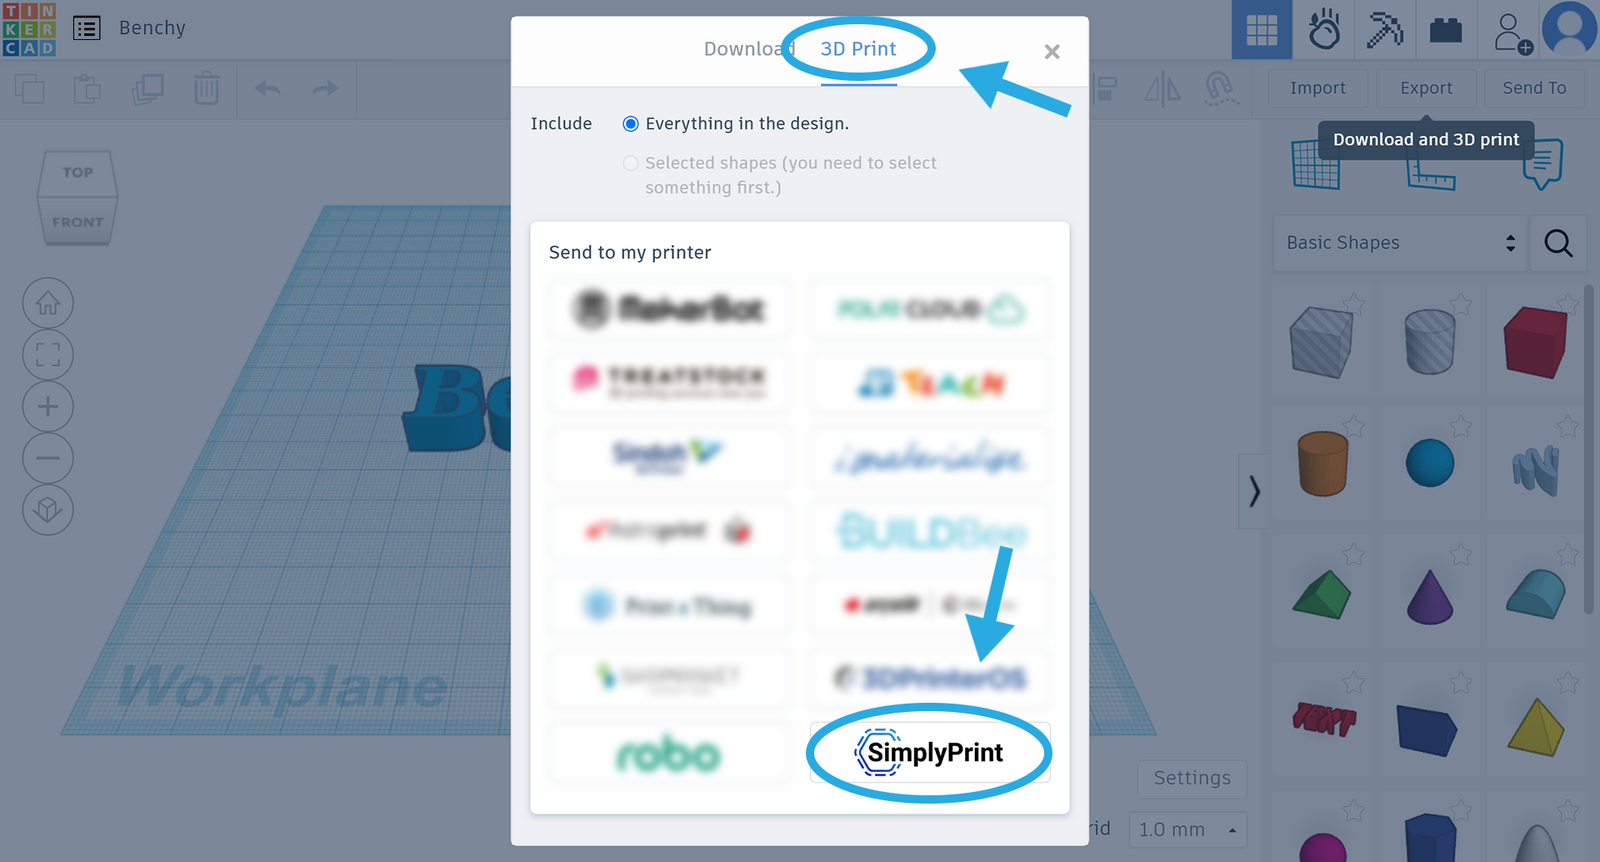
3. Choose 3D Print, then select SimplyPrint
In the Export panel, switch to the 3D Print tab. SimplyPrint appears in the list of receivers. This option is built into Tinkercad, so there is nothing to install or enable first.
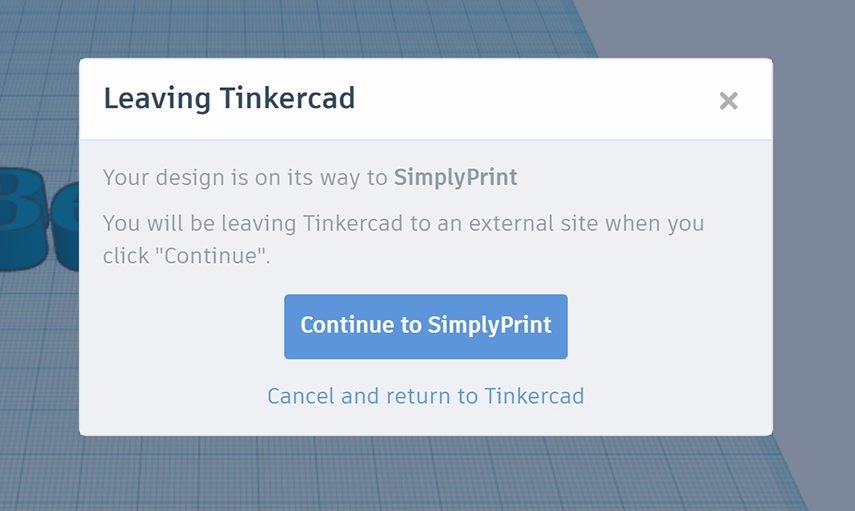
4. Click Continue to SimplyPrint
Tinkercad confirms the handoff and opens SimplyPrint in a new tab. If you are not signed in yet, sign in once and the integration will remember you for next time.
5. Decide what SimplyPrint should do with the design
SimplyPrint gives you three options for the incoming Tinkercad model:
- Save the file to your account so you can slice it later.
- Slice it now with the cloud slicer (OrcaSlicer, PrusaSlicer, BambuStudio, ElegooSlicer, CrealityPrint, or Cura).
- Add to the print queue so it routes to the next available printer that matches.
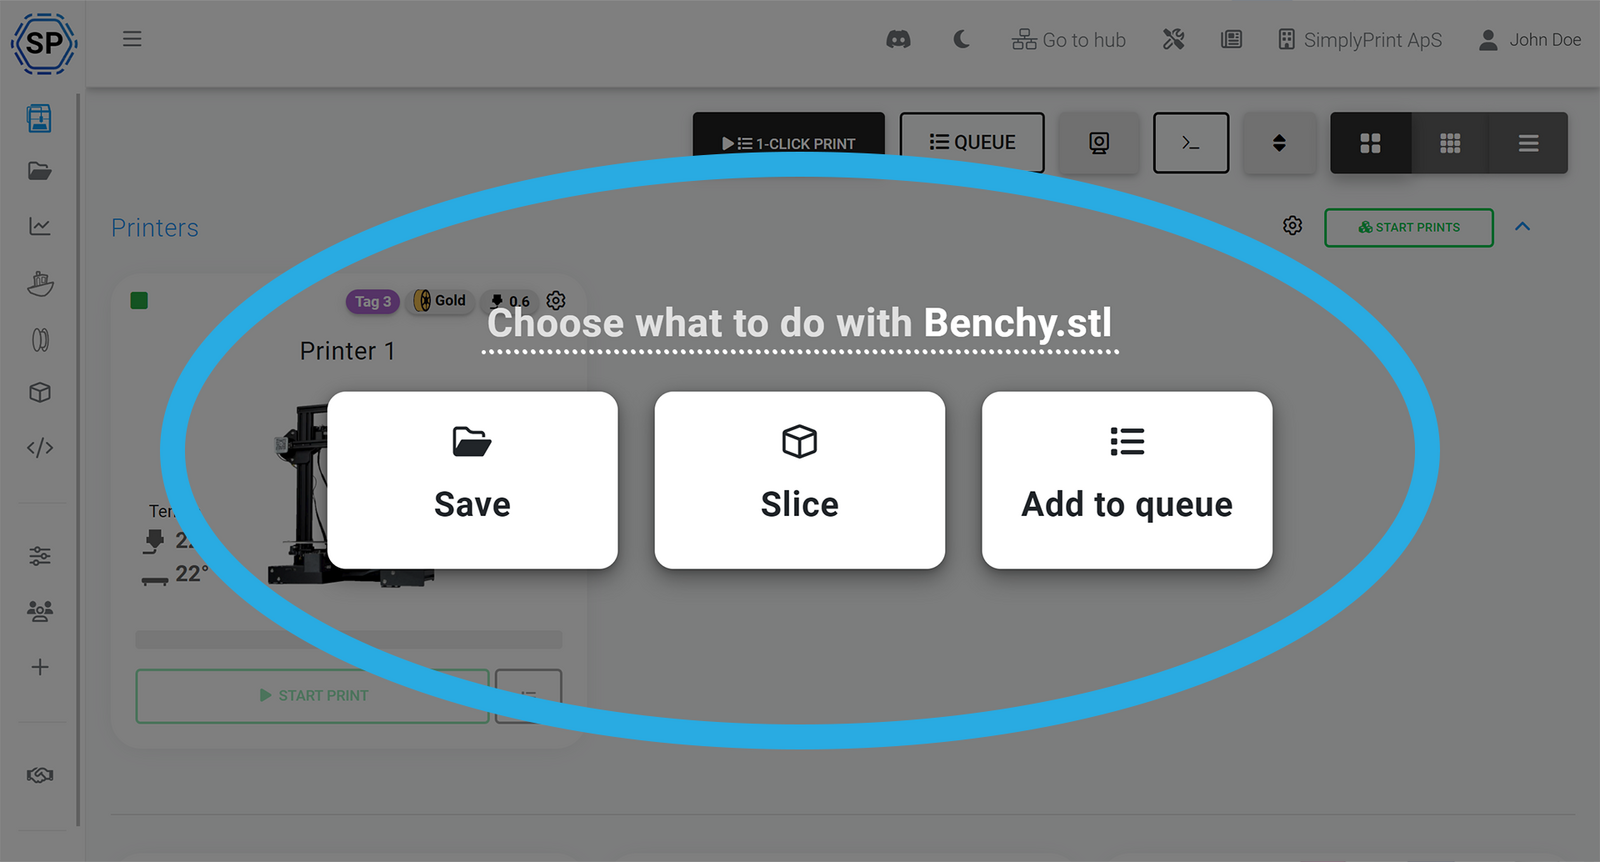
For a classroom, the queue option is usually right: the model lands in a teacher-approved queue and prints when a matching printer is free.
6. Slice and print
If you chose to slice, the cloud slicer opens in the browser with your Tinkercad model already loaded. Pick the engine (OrcaSlicer, PrusaSlicer, BambuStudio, ElegooSlicer, CrealityPrint, or Cura) and a printer profile, hit slice, and the slicing job runs on SimplyPrint's servers, not on the Chromebook. When the slice finishes, send the result directly to a connected printer.
The exact same desktop slicers (the open-source builds, unmodified) run in your Chromebook browser. Switch engines for the same model with a click. Nothing to install, on a Chromebook or anywhere else.
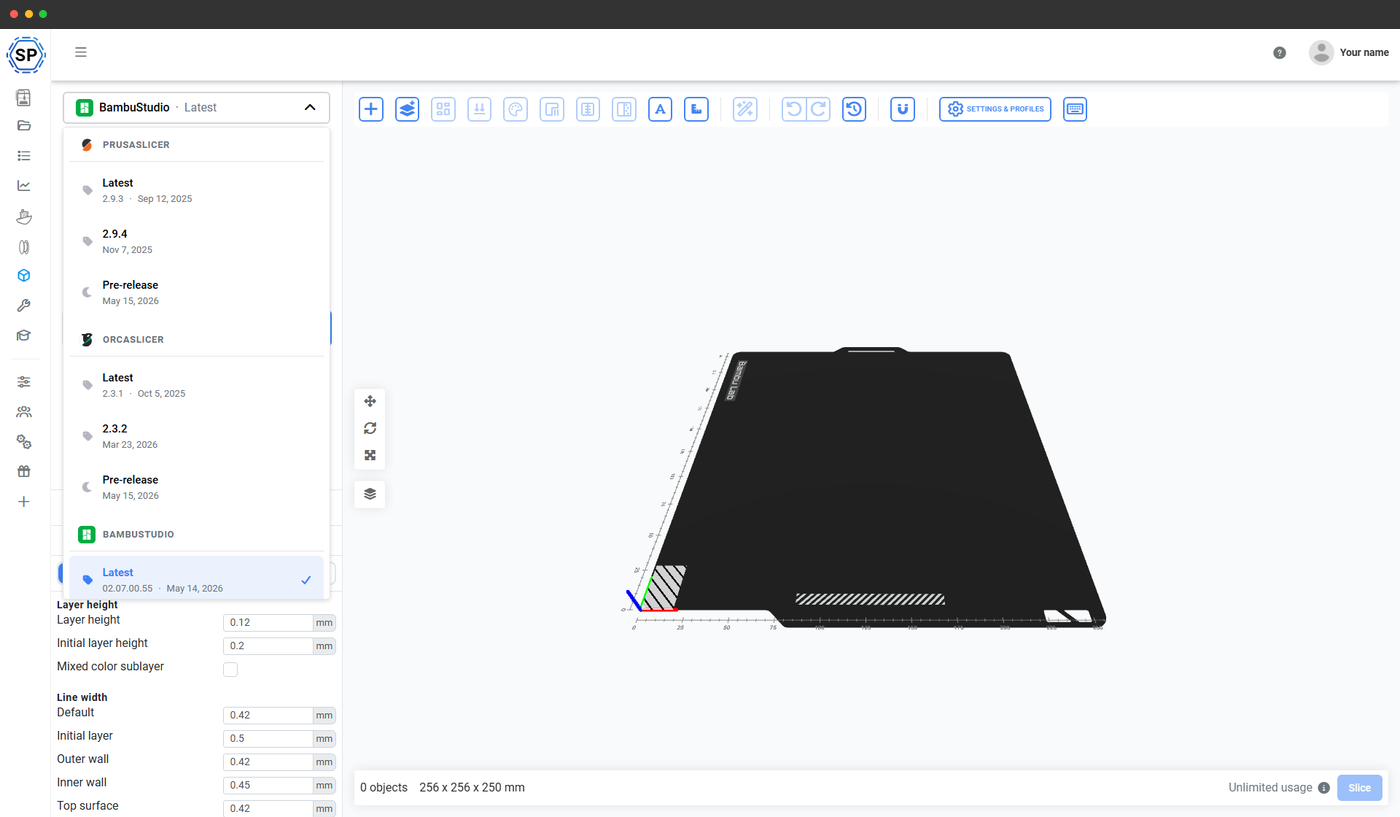
OrcaSlicer running in the SimplyPrint cloud slicer on a Chromebook. Full settings, full profile support, no install.
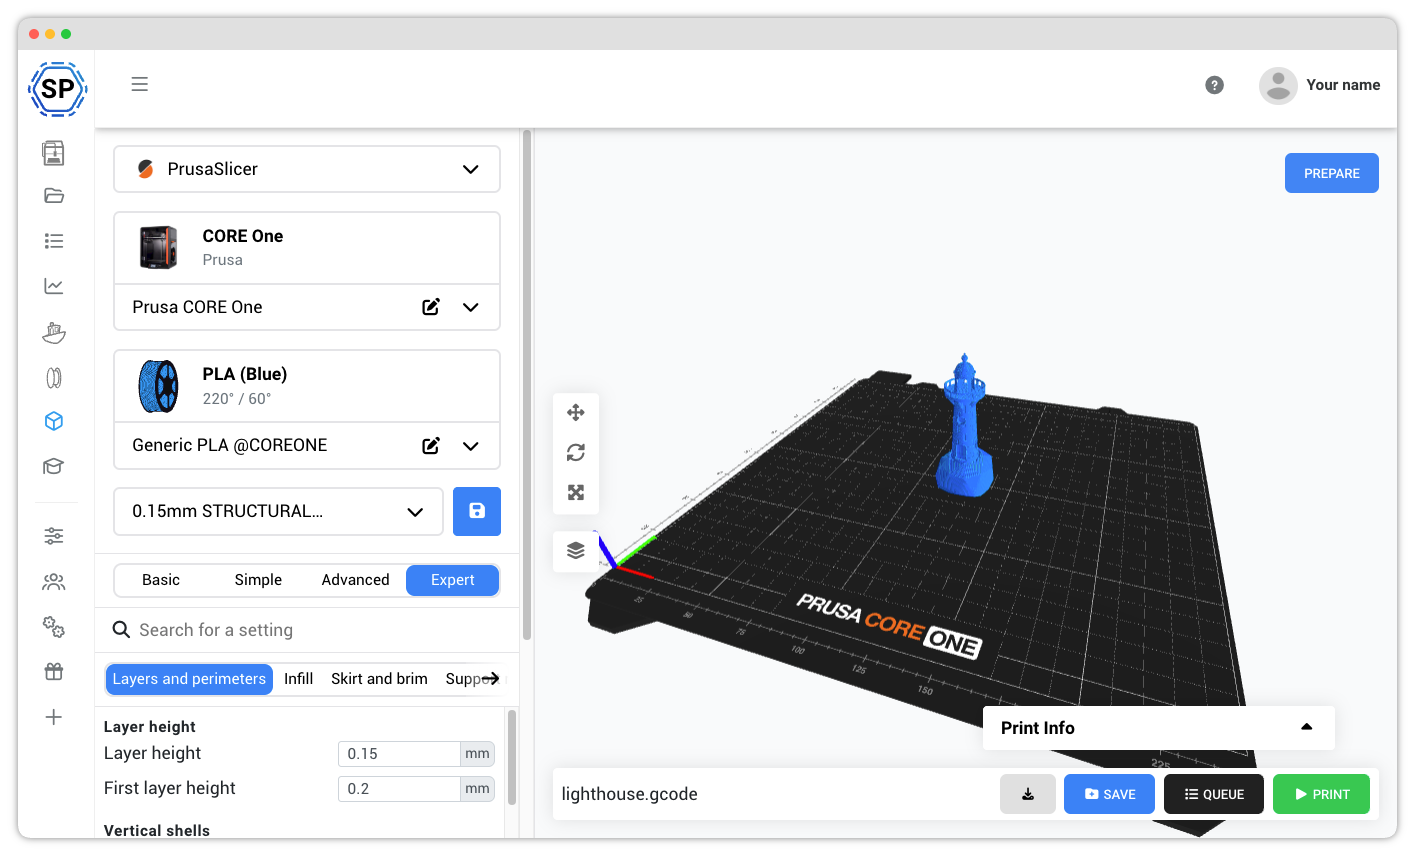
PrusaSlicer in the same browser, same model, same Chromebook. Switch engines for any print with a click.
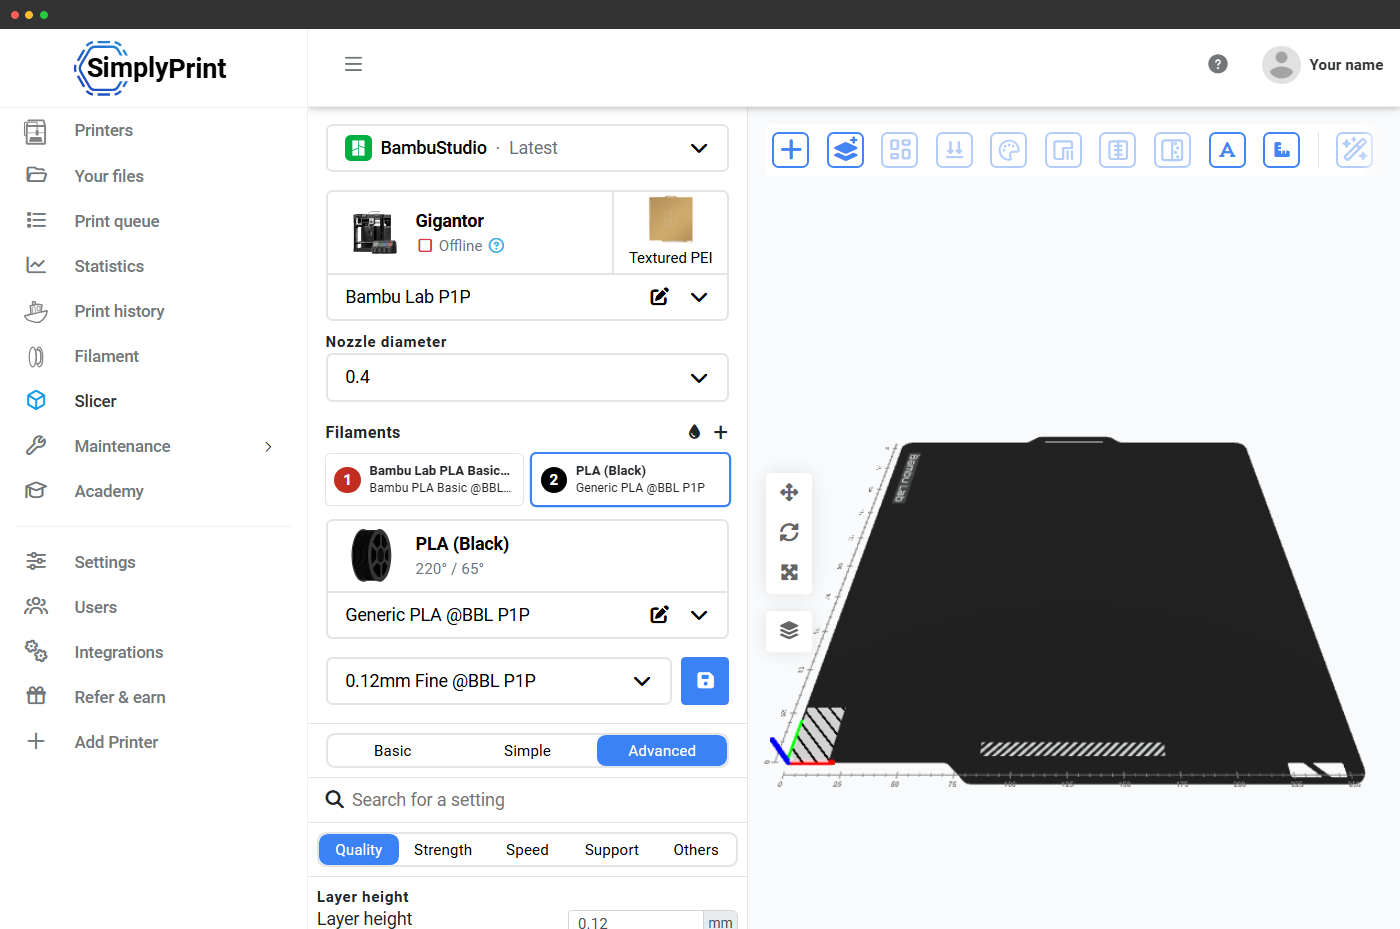
BambuStudio for the X1, P1, A1 series and AMS multicolor. Same browser, same workflow.
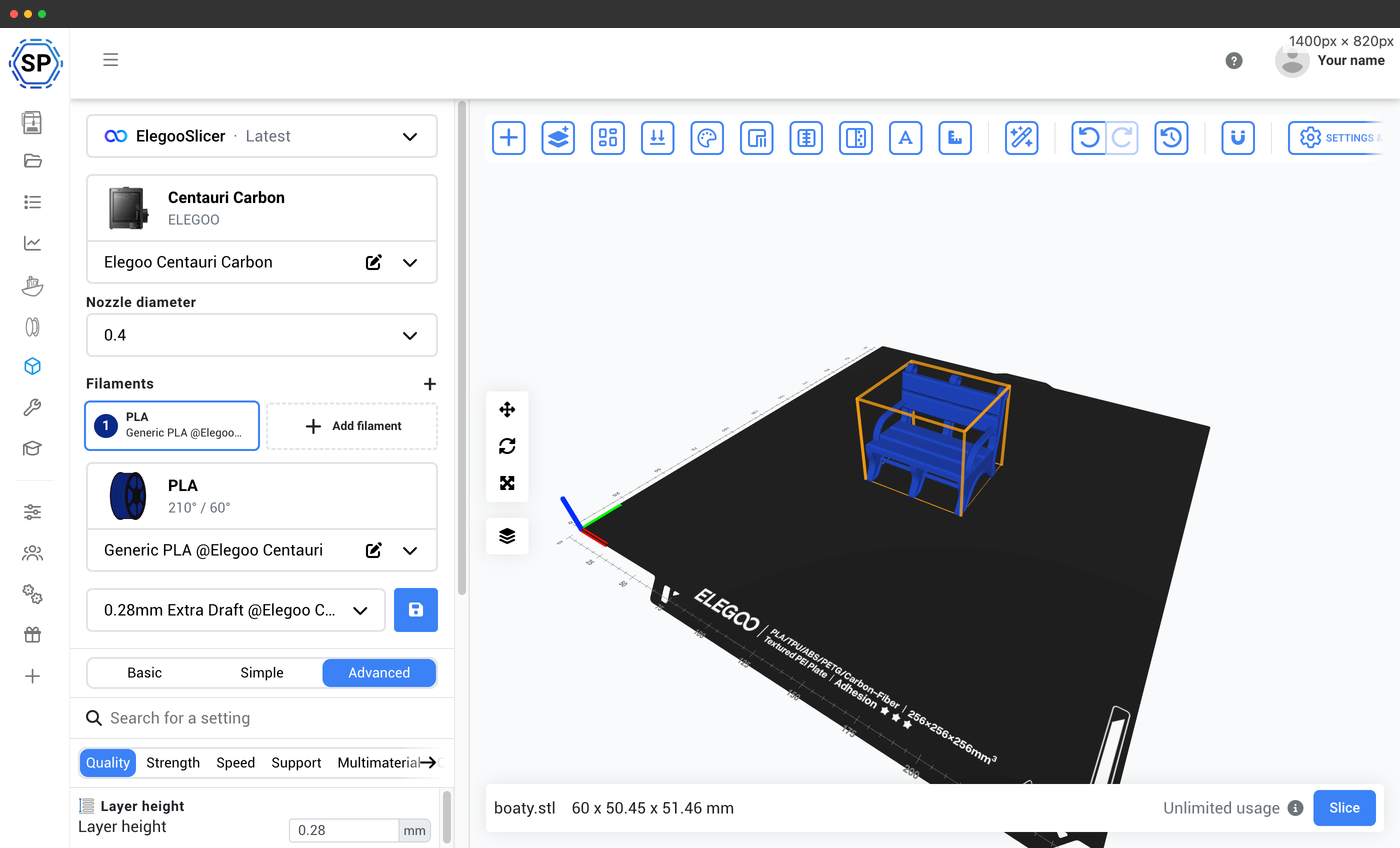
ElegooSlicer for the Centauri Carbon, Centauri Carbon 2 and Neptune family. Elegoo's OrcaSlicer fork, in your Chromebook browser.
Slice, queue, or print: what to pick
The three-way choice in step 5 is the part most first-time users hesitate on. Quick guide:
- Save the file if the student is still iterating on the design and just wants to bank a checkpoint. Nothing prints. The model lands in their file list in SimplyPrint and can be sliced later from any browser.
- Slice now if you want full control over print settings (layer height, infill, supports) before the print starts. This is the right pick for one-off prototypes or when a student wants to learn what the slicer does.
- Add to the print queue if the design is ready and you trust the shared profile. The queue routes the job to the next compatible printer, applies the shared profile, and the teacher can approve or reject it before it actually prints. This is the right pick for most classroom submissions.
Whichever you pick, you get the same desktop slicer engines you would have at home, running on SimplyPrint's servers from your Chromebook browser:
- OrcaSlicer for Bambu Lab printers, modded machines, and the engine most of the 3D printing community has standardised on in 2026.
- PrusaSlicer for Prusa's official profiles, broad printer profile coverage, and a stable settings UI students learn fast.
- BambuStudio for AMS multicolor and the X1/P1/A1 series, since Bambu's own slicer is required for those flows.
- ElegooSlicer for Elegoo's Centauri Carbon and Neptune machines, an OrcaSlicer fork with native profiles.
- CrealityPrint for Creality's K2, Ender and CoreXY range, also an OrcaSlicer fork with native profiles.
- Cura for UltiMaker machines, the one major engine outside the Orca family.
All six are built from the unmodified open-source releases and kept up to date with upstream, so every profile, filament, and advanced setting you would see on a Windows desktop is there in the Chromebook browser. No installer, no Linux container, no compromises.
Online cloudbaseret slicer
Brug PrusaSlicer, OrcaSlicer, BambuStudio, ElegooSlicer, CrealityPrint, Cura & Kiri:Moto online i skyen, på enhver enhed, hvor som helst!
Tinkercad on Chromebook in a classroom: student submission, teacher approval
A single user pressing Export is easy. The interesting question is what happens when 25 students push 25 designs into the same shared printer pool, on Chromebooks, in 50 minutes of class time. SimplyPrint's multi-user features are built around exactly this case:
- Shared printer profiles so every student starts from the same baseline. No one accidentally prints at 0.05 mm layer height with 100% infill.
- Permissions that let the teacher restrict which slicing settings a student can change. Lock everything except print quality and infill and you have a workflow students cannot break.
- A shared print queue that routes every Tinkercad submission through teacher approval before the printer ever heats up.
- Per-student attribution so every job, every filament gram, and every successful or failed print is tracked back to the student who sent it.
The Tinkercad Chromebook export step does not change in this setup. The student still clicks Export to 3D Print to SimplyPrint. What changes is where the model lands: instead of the student's personal SimplyPrint account, it lands in the shared SimplyPrint account the teacher invited them into as a user, with the right defaults already applied.
If you also want students to slice on their Chromebooks (and not just send pre-sliced files), pair this article with the sibling guide on how to slice on a Chromebook. The two workflows compose: Tinkercad handles the design, the cloud slicer handles the slice, and the queue handles fairness across printers.
What this does not do yet
To be transparent about the Tinkercad on Chromebook path: a few things still trip people up in 2026.
- The Export menu only appears in the full editor. If a student is looking at a design in the gallery view or someone else's shared preview, the SimplyPrint tile will not be in the Export list until they open the design into the editor itself.
- There is no batch export. Each Tinkercad design is sent to SimplyPrint one at a time. For a class assignment with several parts per student, that is one Export click per design. There is no "send the whole project" button on Tinkercad's side yet.
- Tinkercad-generated STLs occasionally need a repair pass. Designs that combine many small primitives with thin walls or coincident faces can come out non-manifold. SimplyPrint's slicer auto-repairs most of these silently, but a very few will need the student to go back into Tinkercad, group or merge the offending shapes, and re-export.
If a particular print runs into any of those, fall back to a desktop slicer for that one job and keep the Chromebook flow for everything else. For typical Tinkercad output and typical classroom workloads, the gaps are negligible.
What this means for Chromebook classrooms
If you have been telling Tinkercad students "you cannot actually print this here, do it at home", you no longer need to. The Export to SimplyPrint button turns the Chromebook browser into a complete end-to-end path from a Tinkercad sketch to a finished printed part, with no installer, no Linux container, and no USB transfer along the way. Setup takes about ten minutes per classroom; ongoing maintenance is roughly zero.
For schools running shared printer pools, the same workflow scales without changes. The student presses Export. The teacher approves. The printer prints. The Chromebook stays exactly as locked-down as IT wants it.